Open source content management systems keep winning over marketers. Here’s why.
Marketers today are responsible for more than just publishing content. They manage complex digital experiences across many channels and devices, while staying nimble and data-focused.
Because of this shift, marketers need more than content control. They want flexible tools to launch campaigns faster, personalize at scale, and respond quickly to changes. The goal is a tech stack that’s scalable, adaptable, and free from restrictive vendor contracts.
That’s why open-source CMS platforms continue to gain ground in 2025. Here are just a few of the ways they can support business goals while giving marketers more control over how they work and what they build:
Full Creative Freedom
Open-source CMS platforms allow marketers to design without being boxed in by templates or proprietary rules. With complete freedom to customize look, feel, and functionality, marketing teams can build experiences that truly reflect their brand.
Faster Time to Market
Open source CMS supports agile workflows, prebuilt modules, and integrations with marketing tools. Campaigns and site updates can go live faster, without heavy development delays.
Omnichannel Delivery
An open architecture makes omnichannel delivery easier. Marketers can use API-first and headless-friendly systems to publish content to websites, apps, and social platforms from a single location.
Cost Efficiency
Without license fees, teams can save money and invest in what matters. Open source tools let marketers avoid unnecessary features and build the stack that fits their needs.
Ownership and Control
With open source CMS, marketers keep full ownership of their data. That leads to stronger privacy, easier compliance, and better insights without third-party limitations.
Industry Trends in 2025
Emerging trends are making this shift even more urgent, and open source platforms are built to keep up.
For example, Digital Experience Platforms (DXPs) are becoming more popular as businesses seek to deliver seamless, personalized interactions across all digital channels. Open source CMS solutions fit naturally within DXPs, offering the flexibility and control needed to create rich, adaptable user experiences.
Accessibility, performance, and SEO also matter more than ever. Composable architecture lets marketers build the tools they need.
Seamless Integration
Integration with AI and personalization tools is smoother in open environments. Marketers can plug into new tech quickly and adapt campaigns as tools evolve.
Security and Reliability
Security and compliance have also improved. Open source code is transparent and widely reviewed. Active communities help patch issues quickly and keep systems up to date.
Modern Usability and Support
Current open source platforms offer intuitive backends, strong user management, and rich ecosystems of extensions. Community support is fast, dynamic, and often more cost-effective than proprietary vendors. Old myths about open source being too hard to manage simply don’t hold up.
What to look for in a CMS partner
Marketers should choose open source CMS partners who lead with strategy. Look for someone who begins with business goals and customer needs, then selects tools that support them.
Want to be prepared for the future? Consider open source CMS
Open source CMS gives marketers the flexibility, control, and speed they need to succeed. It’s more cost-effective, secure, and scalable. That makes it the smart choice in a fast-changing digital world.
A campaign cannot do its job if the donation form stops submitting or the event page breaks on a phone. Routine website updates can cause problems like these, even when the change looks small. Automated testing gives your team an early warning, so you can keep improving the site with fewer surprises.
Make updates with fewer surprises
Before a change goes live, tests check for broken behavior and unexpected changes to key pages. Developers and QA specialists review the results and test the update themselves. Your team gets a clearer view of what is ready to publish, and issues are easier to fix before visitors encounter them.
Protect the actions your visitors came to take
People visit your site to do specific things: give a gift, register for an event, submit a request, or sign in. Kanopi identifies the journeys that matter most to your organization and tests them as the site changes. If a covered task fails, the team can address it before deployment. That protects the actions your campaigns and services depend on.
Tests can also compare how key pages look before and after an update. A shifted button, missing image, or broken mobile layout gets flagged for review. Visitors can keep using the site across devices, and your team can protect the design work behind each campaign.
Catch accessibility barriers earlier
A routine update can introduce a missing form label or a color contrast problem. Automated checks can flag many of these issues while the change is still under review. That gives your team time to fix barriers before launch and helps protect the accessibility work already invested in your site.
Automated checks cannot determine whether every visitor can use a page. People also need to review content, interactions, and the site’s compatibility with assistive technology. Together, these checks make accessibility a regular part of website updates.
Focus testing on what matters to your audience
Tests only protect the tasks they cover. AI can help developers spot gaps and draft possible new tests. People decide which visitor journeys matter, review each suggested test, and approve what gets added. Your team gains better protection for the forms and pages tied to its goals.Example Use Cases
Recover faster when a problem gets through
No test suite catches every problem. An outside service may change, or several updates may interact in an unexpected way. When an issue reaches the live site, test results help the support team narrow down the cause and confirm the fix. Your team gets a clear account of what happened and what to check next.
Start with the actions your visitors rely on most. Make those journeys part of your testing plan, and keep the tests up to date as your site and campaigns change.
Healthcare Web Development: Your Complete Guide for 2025
Allison Manley
The nature of healthcare websites has changed dramatically over time as more and more people use the internet as their primary source of medical information. In fact, a CDC study found that 58.5% of American adults use the internet to look for health or medical information. That makes reliable, user-friendly, updated healthcare websites more important than ever.
Are you designing a healthcare website and looking for tips and best practices to create the best online resource for your audience? You’re in the right place—this healthcare web development guide will help answer your most pressing questions.
Developing a healthcare or hospital website is essential to effectively meet your patients’ and community’s needs. A robust, well-developed healthcare website can:
Be a reliable online healthcare resource for your community.Over 70% of Americans say they’ve been exposed to medical misinformation, and 44% reported that they weren’t confident in their ability to tell whether medical information was accurate. Your healthcare website can serve as a reliable resource for community members to receive accurate medical information and support.
Enhance and promote your brand. A professionally designed, robust healthcare website can enhance your organization’s brand, helping you bring more patients on board and retain existing ones.
Enable telehealth activities. 54% of Americans have had a telehealth visit at some point in their lives. Creating a robust, user-friendly healthcare website is essential if your organization wants to start offering telehealth services or expand its telehealth capabilities.
When you develop your website with the best practices in this guide, you’ll reap even greater benefits and grow your audience more effectively.
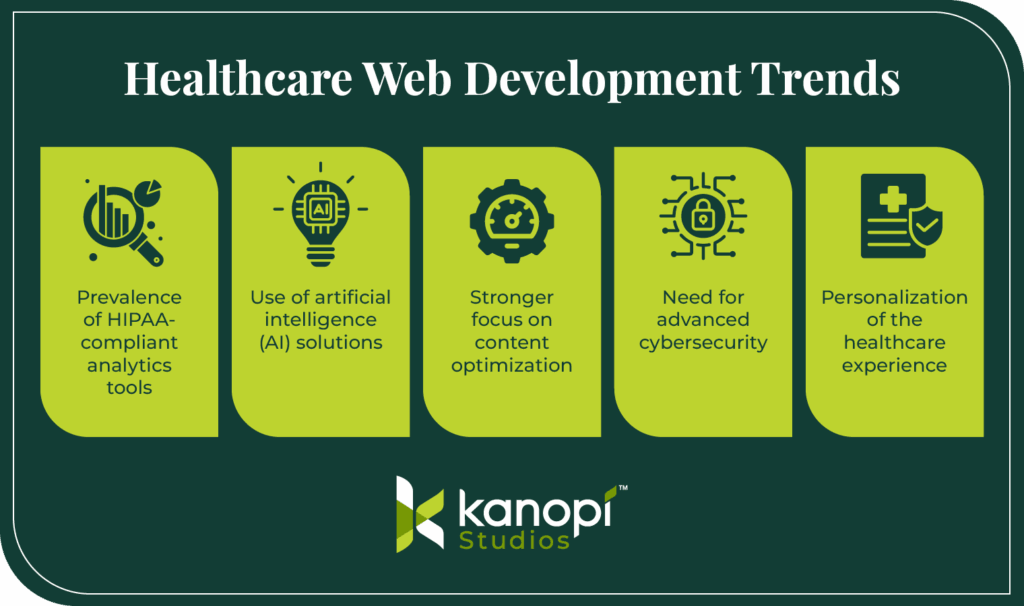
Healthcare web development trends and considerations for 2025
Like all industries, the healthcare sector isn’t immune to shifting trends, opportunities, and challenges. Here are a few considerations to keep in mind as you develop your healthcare website:
Prevalence of HIPAA-compliant analytics tools. Healthcare websites must follow guidelines established in the Health Insurance Portability and Accountability Act of 1996 (HIPAA). Primarily, your healthcare website must protect patient data, known as protected health information (PHI). As a result, healthcare organizations are increasingly seeking out website analytics platforms built with HIPAA compliance in mind. These platforms include solutions like Freshpaint and Piwik that are specifically designed to keep PHI secure.
Use of artificial intelligence (AI) solutions. A Morgan Stanley survey found that 94% of healthcare companies say they already use AI and machine learning in some capacity. Plus, an Orbit Media survey found that the majority of consumers would actually like AI involved in their healthcare decisions, and only one-third of respondents want human-only healthcare. Healthcare organizations must balance leveraging powerful AI solutions to support patient care with maintaining trust and data privacy.
Stronger focus on content optimization. Content marketing has emerged as a huge opportunity for healthcare organizations to engage their audiences and drive leads. Content marketing costs 62% less than traditional marketing and can generate approximately three times as many leads. More organizations are using their websites, including their blogs and news updates, to share credible, authoritative content that helps keep their audiences informed.
Need for advanced cybersecurity. An analysis of healthcare data breach statistics by the HIPAA Journal found a clear upward trend in data breaches over the past 14 years. 2023 saw the most reported data breaches and the most breached records. This is likely due to the increased reliance on data use in healthcare, making it all the more important to keep your patients’ information secure. These threats underscore the importance of developing a secure healthcare website that can withstand cyberattacks.
Personalization of the healthcare experience. 72% of patients say they want personalized care tailored to their individual needs. Including patient logins and dashboards, chatbots, location-based service pages, and accessibility options on your website are all ways you can provide a more tailored experience where patients receive information specific to their needs.
Follow industry blogs, like Kanopi Studios, to keep up-to-date with recent developments in the healthcare sector that impact your web development process.
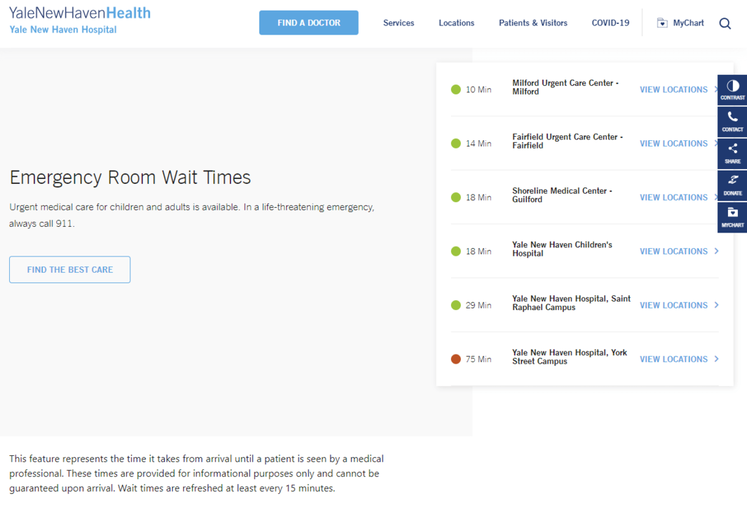
The Yale New Haven Hospital website includes multiple useful homepage CTAs to find a doctor, find a location, make an appointment, and request medical records, simplifying the user experience.
Think about your website goals and the services your organization offers to start narrowing down your website features list.
How much does a healthcare website cost?
The cost of your healthcare website will depend on how complex your site will be. If you’re a small solo practitioner with more basic website needs, your site will be less costly than a website for a large hospital system with multiple locations.
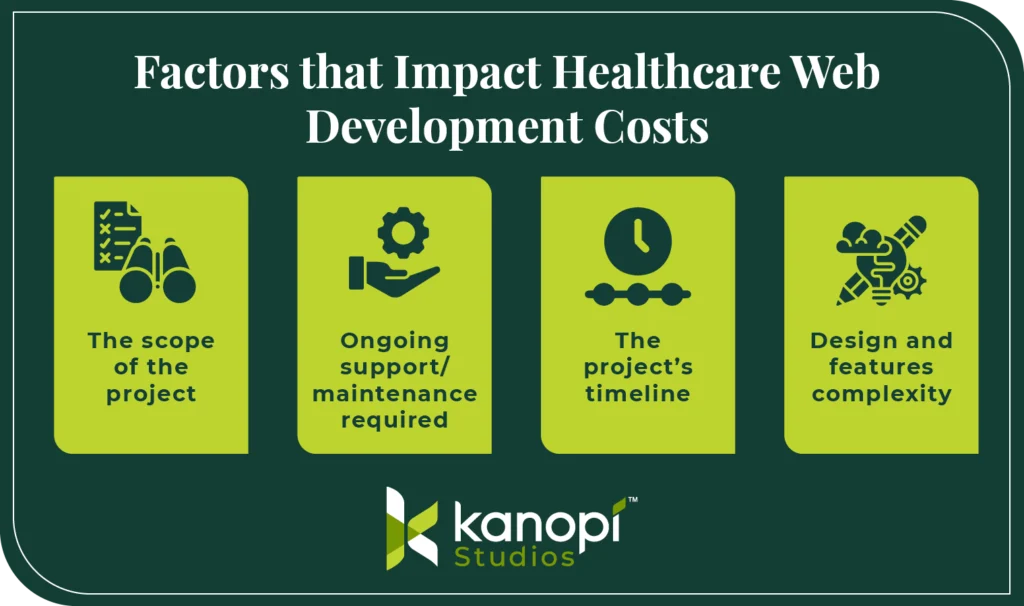
As a result of this wide range of needs, the cost of healthcare web development can vary greatly, from less than $10k for small practitioners to over $250k for organizations with more complex needs. Several additional factors go into the cost of website development, including:
The scope of the project: A website refresh is typically less costly than a full build.
Ongoing support/maintenance required: A highly complex website will require greater maintenance, leading to higher maintenance costs over time.
The project’s timeline: If you have just a few weeks to get a brand-new healthcare website up and running, your developer may charge you more because they’ll have to devote more time to your project.
Design and features complexity: A relatively simple, basic website will generally be less expensive to build and maintain than a complex, robust website with many features. Your healthcare website may need to serve as a comprehensive patient resource, with telehealth functionality and a patient portal, which can increase costs. However, spending more to create a better, more functional website can pay off in the long run, helping you increase your patient base and ROI.
Ask for consultations from your top developer candidates to get a sense of how much your project will cost. Also, review each agency’s web development philosophy and long-term support options. For instance, Kanopi takes a holistic approach to healthcare web development, conducting ongoing security patches, module upgrades, and user experience refreshes to ensure your website stays sustainable and viable over the long term.
Steps for creating a healthcare website
What does the healthcare web development process look like? As a marketer, you’ll be heavily involved in the development process, even if you work with a developer to handle the nitty-gritty technical aspects.
Your input will be invaluable for ensuring your website meets your audience’s needs and maintains your organization’s reputation. Therefore, it’s important to understand the following steps to make the process as seamless as possible:
1. Set goals
Set realistic goals for your healthcare website based on relevant key performance indicators (KPIs). For example, you might choose to set goals and track progress for the following KPIs:
Leads generated: The number of prospective supporters who have demonstrated an interest in some aspect of your organization’s activities, such as becoming a patient, donating, or volunteering.
Conversion rate: The percentage of website visitors who take a desired action, such as registering for an appointment or subscribing to your email newsletter.
Patients served by telehealth: Total patients who successfully used your website and telehealth portal for online appointments.
Unique website visitors: The number of users who visit your website once within a defined time frame and are counted only once.
Organic traffic from search engines: All website visits that result from organic listings (not paid ads) on search engine results pages.
Ensure any goals you set related to these KPIs are specific and measurable. For example, you could aim to increase your conversions by 25% within six months or expand your number of successful telehealth appointments by 500 in a year.
Setting specific targets will provide greater direction to your web development project. You’ll have an easier time monitoring your progress and determining the return on investment (ROI) of the web design process.
2. Choose a healthcare web design consultant
Most healthcare organizations don’t employ a web developer on staff. That’s why your organization may be looking to outsource your website development project.
Working with a healthcare web design consultant is highly recommended and commonplace for projects of this magnitude. Your healthcare web developer will:
Offer expertise based on years of experience and training.
Implement best practices into your healthcare website so that it’s sustainable and useful for your audience.
Maintain your website over time so it remains a performant, flexible, and secure resource.
After selecting a healthcare web developer to work with, they’ll become a collaborative partner in designing your website. They’ll take the reins on the technical aspects of bringing your website to life, but your marketing team’s input will be crucial for guiding the direction of the design and development process.
First, you’ll work together with your developer to perform background research on your online audience. This will include:
User research: Who are your online audience members? What matters to them when it comes to engaging with your healthcare organization online? What barriers do they face when using your website?
Market research: What similar healthcare websites already exist? How will your website be different or similar? How can you fulfill an unmet need in the market?
Vision, goals, and strategy: What will success look like for the project? This is where your quantitative goals will come into play. But you can also set larger aims, such as “In six months, we’ll have a robust website that effectively serves our patients, enhances our brand, and helps us form beneficial partnerships with other organizations in our community.” Understanding your overarching objectives will be indispensable for your developer.
Ultimately, your healthcare website is meant to make your patients’ lives easier. Starting with a clear understanding of who your audience is and what matters to them will help you keep their interests at the forefront of the web development process.
4. Plan your medical website design
Web design is your website’s visual look. Design influences 94% of all first impressions, meaning it should be a top priority in the healthcare web development process.
Collaborate with your website designer to share your organization’s brand guidelines, including your logo, color palette, and typography. Your designer will incorporate these elements into an overarching website theme and layout.
Explore our healthcare web design guide for examples of effective website designs to get inspiration during this stage of the development journey. Your website design should seamlessly incorporate the features outlined above into a streamlined, visually appealing design that reflects your organization’s brand and style.
5. Optimize the technical aspects of your healthcare website
Next, your developer will update or optimize your website’s technical elements. The foundational elements that make up your website are even more important than your site’s visual look. Without a solid structure, your website risks security issues, poor user experience, and low traffic.
Your developer will handle the following technical development needs:
Site migration: Transferring your existing website’s data to a new CMS.
Module/plugin development: Designing custom modules or plugins as needed to extend your site’s functionality.
Integrations: Ensuring your website integrates seamlessly with other digital tools, like your CRM and marketing software.
SEO optimization: Ensuring your website’s most important pages are easy to find via search engines.
User testing: Showing your website to real users to have them test different elements like the navigation and forms.
Along the way, your developer should explain every step of the technical updates they’re making and how they impact your marketing team. They should train your team on how to make updates in your CMS, such as uploading blog content or updating service pages. They should also ensure your marketing team members know exactly how your integrations and plugins function. This will allow you to make updates independently without having to continuously reach out to a developer for support.
6. Streamline the user experience
The user experience is the way visitors interact with your website. 88% of users say they’re less likely to return to a website after a bad user experience, which can negatively affect their perception of a brand.
Provide a positive, engaging user experience by optimizing your:
Content strategy: Tailor your website’s content to match your audience’s interests. Use your user research and website testing to gather feedback on the types of blog posts, videos, photos, and testimonials that are most relevant and appealing to your audience.
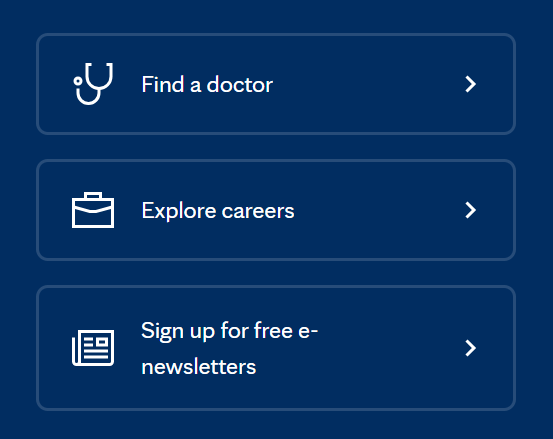
User journey: Ensure your website offers clear user pathways for each of your core audiences. For example, you may design user pathways for current patients, prospective patients, patients’ family members and other visitors, and donors. Then, you’ll use navigation elements like homepage CTAs and menus to help guide each user toward the information that’s most relevant to them. For example, check out these CTAs on the Mayo Clinic website. They lead to resources for those looking to find a doctor, explore career opportunities within the clinic, and sign up for free e-newsletters:
Navigation: Your website should leverage intuitive, consistent navigation across all pages. Use navigational aspects like a sticky main header to help users orient themselves on your website and find what they’re looking for. Take a look at the Cleveland Clinic’s main header as an example—it includes an internal search option and answers users’ most common questions by pointing them to location information and appointment booking:
User experience case study: The Colorado Health Foundation
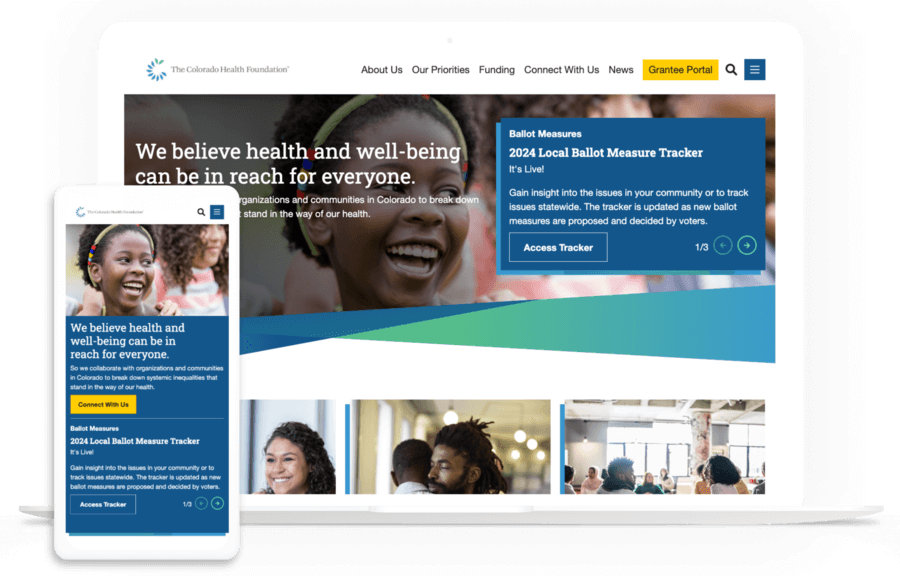
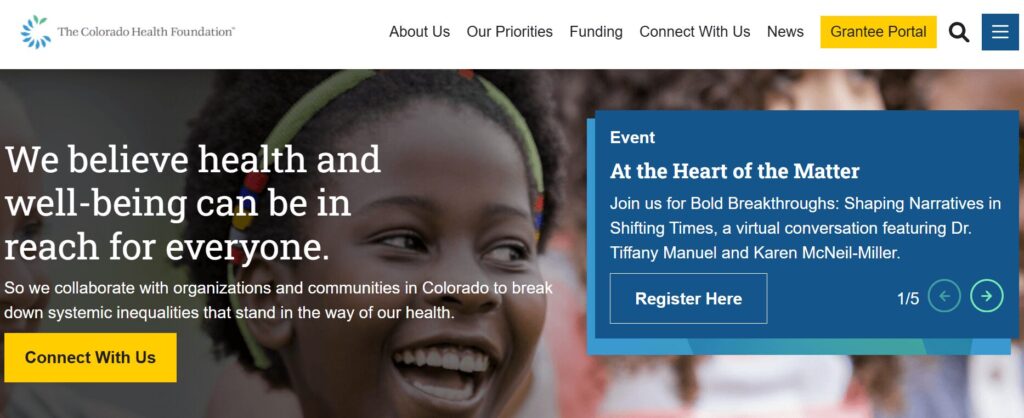
If your website’s user experience is not up to par with these examples right now, don’t despair. The Colorado Health Foundation was in a similar position when they first started working with the web design experts at Kanopi. The site was confusing to navigate and cluttered and leveraged an outdated version of its CMS.
The Kanopi team used its signature iterative process to identify user needs and navigation roadblocks. Major fixes included:
Reducing the number of main menu items to just six overarching categories
Condensing content to simplify user pathways
Adding collapsible accordions to streamline page design
Centering the organization’s mission
Improving accessibility
Now, the organization’s website is clean and streamlined, helping all user groups navigate through easily and find the information they need. Review the live site to see these changes in action and read the full case study here.
7. Maintain your healthcare website over time
Whether you’re using Drupal, WordPress, or another CMS, ongoing website maintenance is crucial for the continued success of your website. The average website lifespan is just two years and seven months. That’s why your organization should prioritize making continuous improvements to your site over time to keep it healthy, updated, and accurate.
Your web developer can offer the following maintenance services to help your website thrive:
KPI tracking: Check in on your goals and KPIs with ongoing reporting.
CMS updates: This could include updating the core or version of your CMS, refreshing plugins, enhancing modules, etc.
Security enhancements: Implement security patches and updates to fix bugs or vulnerabilities.
Performance updates: Run performance tests to ensure your website loads quickly and is free of SEO issues and broken links.
Explore Kanopi’s healthcare web development services
Looking for a dedicated healthcare web development partner who can see your project through every stage? Kanopi has the experience and expertise you need to build an engaging website that exceeds your goals and your audience’s expectations. We can help walk you through every step of the web development process outlined above.
Here’s what we bring to every website project:
Research and discovery to understand your stakeholders and market on a deeper level
An engaging content strategy that goes beyond just storytelling to emotionally connect with your audience
User experience and journey mapping to help users achieve their goals on your site
Clear, uniform branding for cohesive communications
Website design that blends storytelling and user experience to increase conversions
Website development that makes the complex simple and turns your vision into a reality
Ongoing support to keep your website healthy for years to come
Accessibility considerations baked into every step of the development process
97% of Kanopi clients return year after year, speaking to our ability to act as a productive long-term partner to facilitate your site’s success.
Learn about our award-winning healthcare development project
The Department of Surgery at the University of California, San Francisco is one of the most prominent surgical departments in the world, and they needed their website to reflect their high-quality care. The UCSF team came to Kanopi with a variety of challenges:
The website consisted of over 80+ different domains speaking to a broad range of stakeholder needs, and the domains didn’t have any design or navigation consistency.
The site lacked a clear content strategy and included confusing navigational features that led to dead ends in the user experience.
The CMS didn’t provide an easy way to share content.
The content itself wasn’t patient-friendly and didn’t effectively serve audience needs.
UCSF needed an overhaul to better serve its audience. The Kanopi team was ready to assist with a variety of strategic fixes, including:
An internal search function powered by Drupal that makes it easy to browse different domains
Human-focused images that place greater emphasis on the patient experience
A mobile-first, accessible design approach
As a result, users can now browse the site with ease, accessing the information they need without usability or navigational barriers. Our work was even recognized with a W3 Award for best user experience and a Web Excellence Award for the categories of Health Care Community and Health Care Services.
Building a healthcare website isn’t just about expanding your organization’s services. It’s about creating a helpful resource that anyone in your community can use to get their pressing medical questions and concerns answered. By following the steps in this guide, you can design a healthcare website that prioritizes compassionate care.
Looking for additional resources to support your healthcare web development journey? Start here:
The ROI of Great Website Design. This guide explains the importance of investing in quality web design services because it can pay dividends for your organization in the long run.
Webinar: Website Best Practices for an Aging Population. Kanopi’s Cliff Persaud discusses the challenges and opportunities facing healthcare providers, and how they can ensure their website design meets the needs of aging patients.
9 Standout Hospital Web Development Examples & Expert Tips
Allison Manley
Your hospital web development is vital to modern patient care in the digital age.
With 89% of patients in the U.S. Googling their health symptoms before going to the doctor, your hospital website is essential to serving your community’s needs and providing accurate, trustworthy information.
Your website serves as a virtual front door for patients and potential visitors, providing them with essential information about the hospital’s services, specialties, and facilities. A user-friendly structure and design instills credibility and enhances the patient experience by allowing easy access to critical details, such as appointment scheduling, contact information, and directions.
To develop your website effectively and ensure it supports your community, we’ve created this guide, which covers:
Before someone goes to the doctor, they’ll likely browse through a couple of physicians, make sure they’re in their healthcare network, scroll through times for an appointment— and do it all online.
People also turn to your website to answer medical queries, get updated on recent healthcare news, donate to your institution, and access an online health portal where they can update appointments and pay bills. A well-developed site helps to:
Craft a recognizable, highly reputable brand. If your hospital website doesn’t exist or contains outdated resources, it’s more than likely that people will take one look at it and deem your institution unreliable.
Differentiate yourself from other hospitals. A well-designed website communicates your commitment to patient-centered care, innovation, and technology, which can set you apart from competitors.
Build customer loyalty. To build customer/patient loyalty, your website needs to establish itself as a reliable medical web resource so that individuals can use it to make appointments, contact doctors, and pay bills.
Offer 24-hour patient communication and information. Your website provides patients with important information and resources outside of normal office hours.
Simplify marketing for hospital events and needs. Use your website to promote hospital events, streamline donation appeals, and attract more patients.
While it may feel daunting to get started with hospital web development, it’s a worthwhile investment. Improving your online presence is the first step toward attracting and retaining more patients.
Features to Include in Your Hospital Website
Whether someone is coming in for a quick check-up or a visit to the ER, your hospital website is an integral part of their journey. To ensure it serves your community to the best of its ability, your website needs these specific site features:
Simple navigation and menus
A list of services your hospital provides
Appointment booking tools
Contact details
Interactive advanced search functionality
Doctor/team information
AI-powered chatbots to answer patient questions and personalize the visitor experience
Top Hospital Web Development Examples and Best Practices
The best way to determine if your hospital website is up to par is to look at other successful sites. Review these hospital website examples to inspire your web development efforts:
1. Simple navigation: Global Brain Health Institute
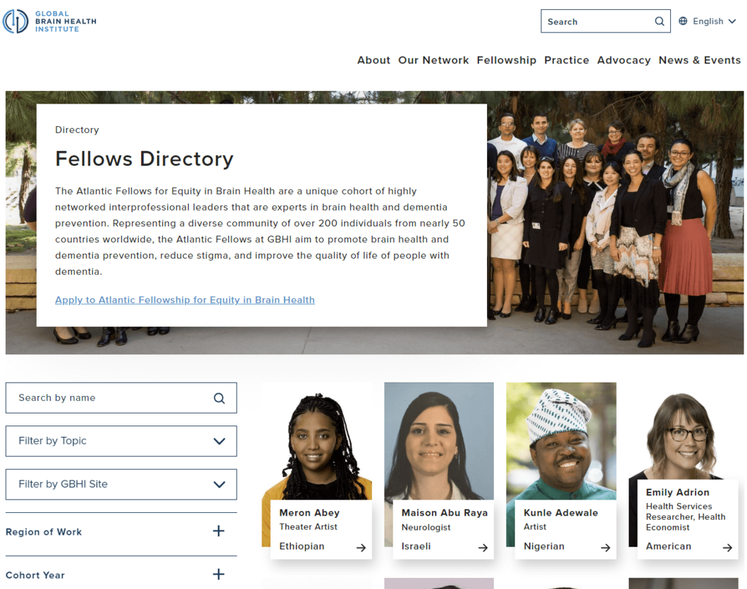
The Global Brain Health Institute (GBHI), an organization dedicated to protecting the world from brain disease and other health threats, wanted to ensure that visitors could easily navigate their site and locate different programs, services, and projects.
As a result, they worked with Kanopi to add a navigation bar that is logically organized and prominently placed throughout the website, so users can quickly find what they need. The site also features a fellowship directory that includes a search bar and filters. This is useful for medical students interested in pursuing a fellowship in a particular specialty, as well as for patients who want to learn more about the expertise of the hospital’s staff.
Why simple navigation is essential for hospital websites: As soon as someone lands on your hospital website, they should be able to find the content or service they seek. To ensure your site is easily navigable, consider mapping out the patient journey to better understand how people get to your site and what they do once they get there.
2. Clear CTAs: Mayo Clinic
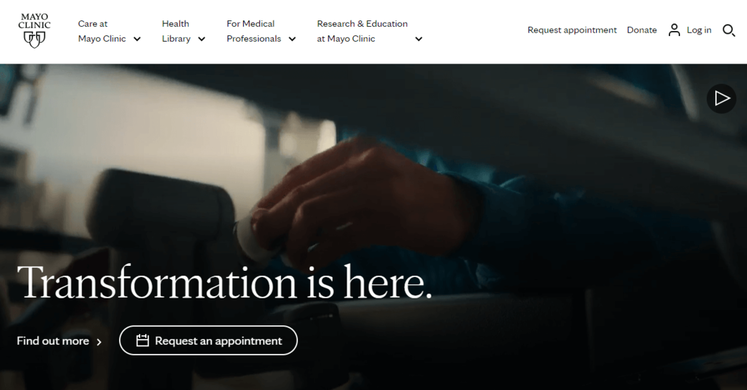
The Mayo Clinic is a nonprofit academic medical center, known for its expertise in many areas of medicine and for providing high-quality care to patients. Their homepage features multiple calls to action (CTAs) that encourage visitors to schedule an appointment, donate, or learn more about a particular medical condition or procedure.
By including clear CTAs on their website, the Mayo Clinic helps visitors understand what medical services they provide, what treatments are available, and how to seek help if they need it.
Why clear calls to action matter for hospital websites: Carefully-placed CTAs let website visitors know exactly where and how to complete their intended action. As you create your own, consider the specific actions that you want visitors to take. Then, use clear and concise language to convey your purpose. For example, you might say “Schedule an Appointment Today” or “Learn More about Our Cancer Center.”
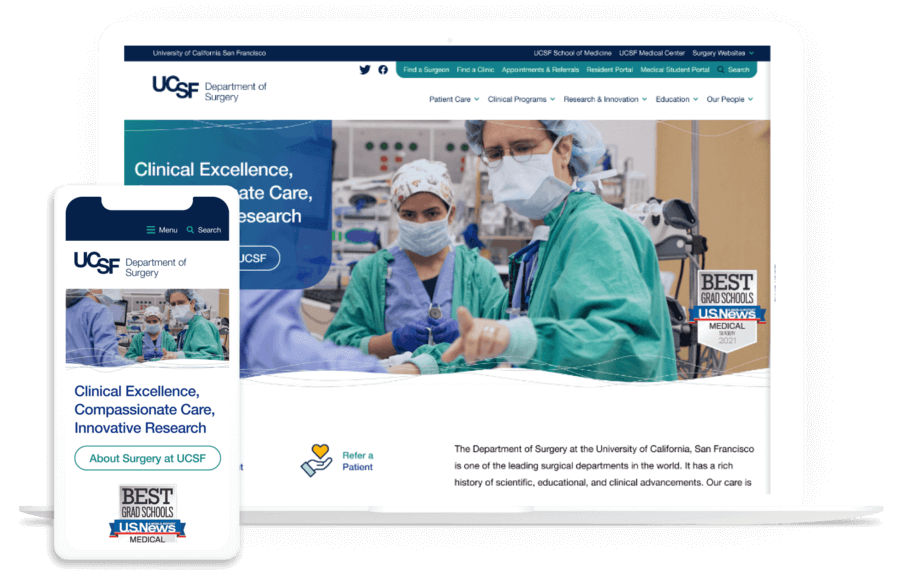
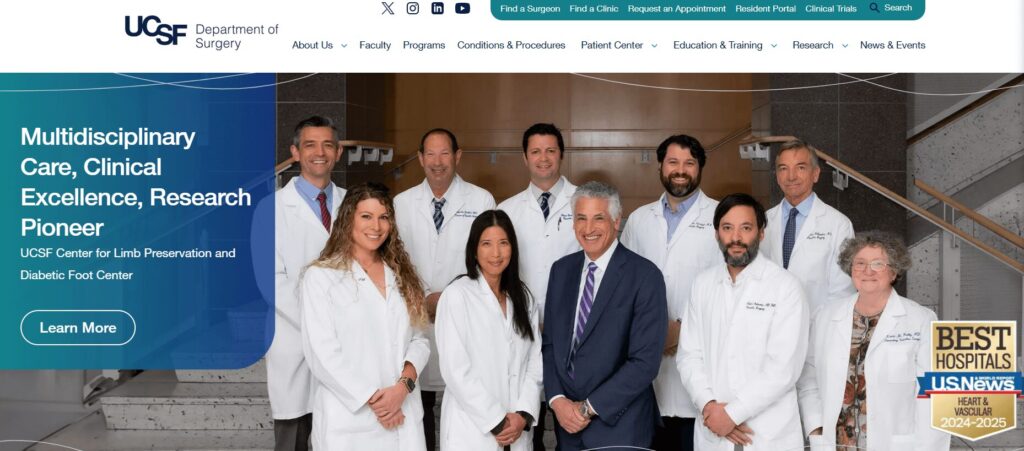
3. Patient-focused design: UCSF Department of Surgery
As a result, we helped enhance this website with a variety of user-friendly fixes, including:
Simple domain access with consistency across topics and departments
Human-led imagery of UCSF doctors and videos highlighting the patient experience
A mobile-first approach with a responsive design
Why patient-focused design is essential for hospitals: Your patients are the heart and soul of your hospital, and appealing to their needs will help you maintain high audience engagement. Patients should feel welcomed and comfortable using your website and signing up for your services. A friendly, patient-focused design helps foster a sense of community.
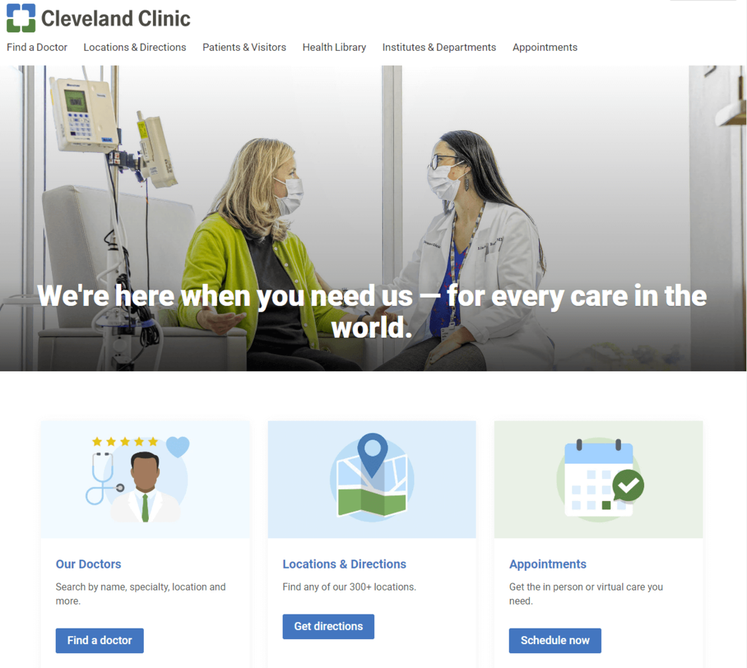
4. Consistent, bold branding: Cleveland Clinic
Cleveland Clinic is one of the top multispeciality academic medical centers in the country. To establish a strong, recognizable brand and reinforce their reputation, they included bold, eye-catching colors throughout their website.
Notice how all of the elements on their homepage are blue and green. When patients come across these colors in other mediums and materials, they’ll likely associate them with Cleveland Clinic.
Why consistency and bold branding is important for hospital websites: Consistent branding builds trust between patients and your hospital, which can be especially important in the healthcare industry where patients often have significant concerns about their health and well-being.
Adding color is a popular medical website design trend, with vivid and deep colors being sported on many successful hospital websites. Consider your site’s color palette before diving into web development to make sure your website branding is consistent throughout its pages.
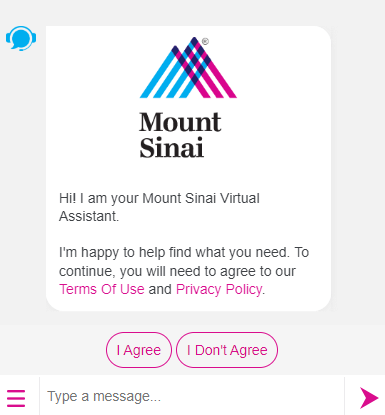
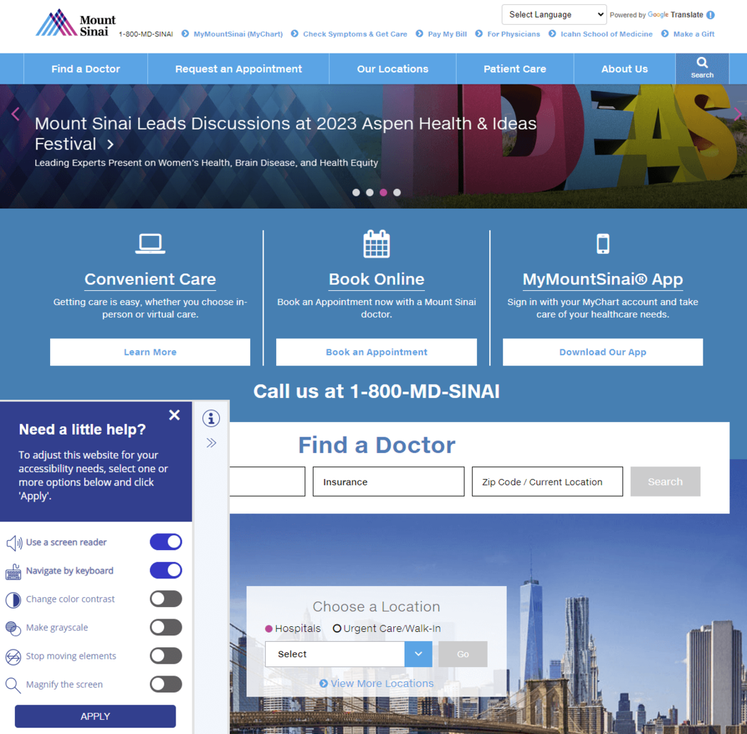
5. Accessibility: Mount Sinai
Mount Sinai’s healthcare system prides itself on providing a wide range of services to diverse populations, including medical education, research, and patient care. To meet their patients’ varied needs, they prioritized creating an accessible website.
The accessibility tool in the bottom footer allows visitors to use a screen reader, navigate using their keyboards, and change the color contrast, if needed.
Why accessible design matters for hospital websites: Having an inaccessible hospital website will not only turn away those who might need your services the most but paints your entire establishment in a negative light. Because of the industry that you’re in, maintaining full compliance with the ADA and WCAG is essential. You want your entire community to feel accepted and at ease with your services, especially when it concerns medical care.
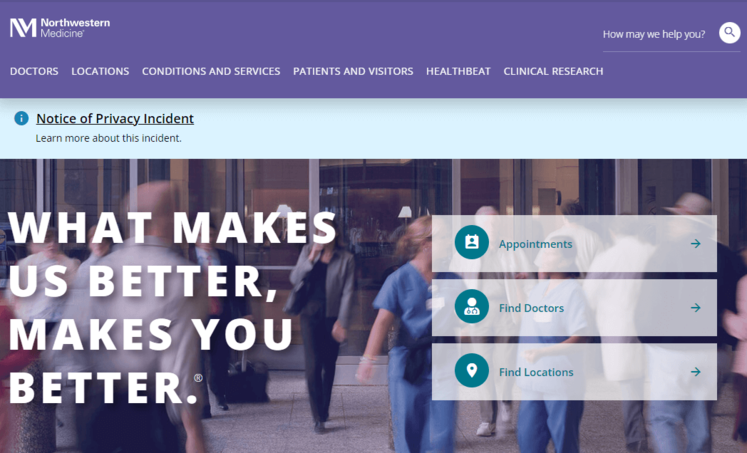
6. Inclusivity: Northwestern Medicine
Northwestern Medicine has a number of hospitals, all of which are committed to providing inclusive care to patients of all backgrounds and demographics. Maintaining an inclusive website is important for Northwestern Medicine, as it allows them to better connect with their patients and provide them with the resources and care they need.
Their Patients and Visitors page is extremely comprehensive, with CTAs that address a wide variety of concerns and questions.
Why inclusivity is important for hospital websites: Your hospital website content needs to represent the voice of all of your users, whether it’s patients, frontline workers, researchers, or caregivers.
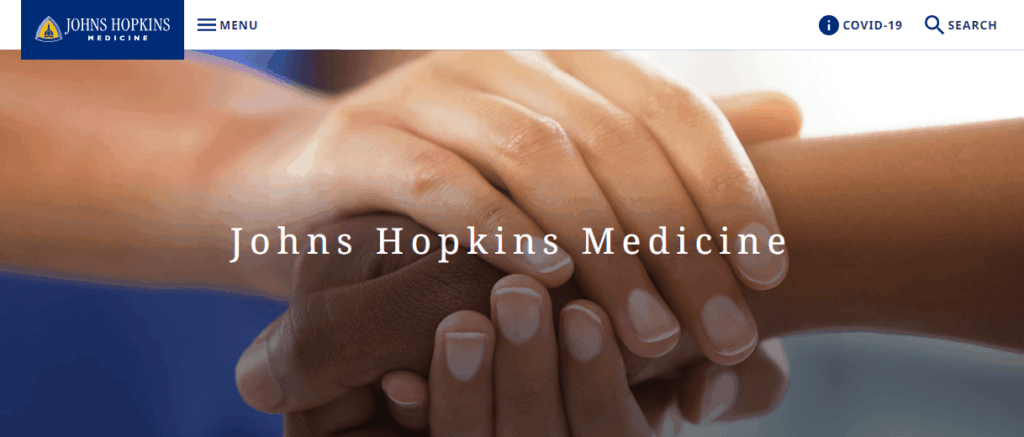
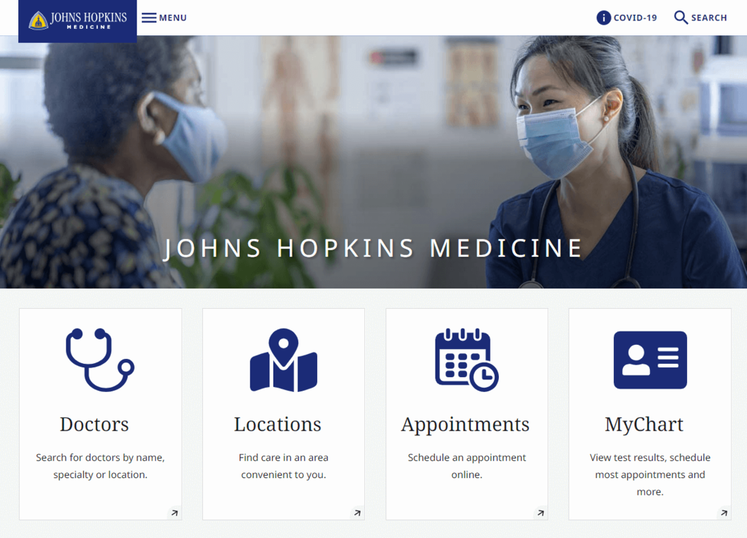
7. Mobile-friendliness: Johns Hopkins Medicine
Johns Hopkins Medicine is known for its world-class medical facilities, including hospitals, clinics, and research centers. As a leading healthcare provider, they needed to keep up with changes in technology by creating a mobile-friendly website.
Their mobile-responsive site design allows patients to schedule appointments, access medical information, and communicate with healthcare providers, regardless of the device they’re using.
Why mobile-friendliness matters for hospital websites: With over 60% of the global internet population using a mobile device to access the internet, your hospital web design must work on all different screen sizes. For patients or families already in the hospital or waiting room, the ability to quickly look something up on their phone or tablet is critical.
Most content management systems (CMS) can create a mobile-responsive site automatically. However, there are some easy ways you can ensure your site’s responsiveness. For instance, use large buttons, a vertical layout, and avoid large chunks of text.
8. Accurate, updated information: Yale New Haven Hospital
Yale New Haven Hospital provides a wide range of medical services to its local community. As with any hospital, their website needs to provide accurate and reliable information about their services, facilities, and medical personnel. That way, patients can make informed decisions about their care.
Perhaps most notably, Yale New Haven’s homepage features emergency room wait times, informing patients where to seek care and what to expect when they arrive.
Why accurate and updated information is essential for hospital websites: When it comes to healthcare, accuracy is non-negotiable. It’s critical that your web content is consistently updated and provides the most high-quality information available.
9. Streamlined user experience: Colorado Health Foundation
The Colorado Health Foundation (CHF) is a statewide organization that aims to improve the health and well-being of all Colorado residents. The CHF partnered with Kanopi to clean up their site’s navigation and streamline the user experience.
Based on our research and expertise, our developers instituted impactful changes. We condensed the main menu to a cleaner version focused on the items that matter most to users. We also improved the visitor journey by:
Ensuring consistent page layout
Incorporating translation support
Adding accordions to streamline page design with collapsable text
Building a data display to foster accountability for the organization’s racial and health equity goals
Enhancing accessibility with clearer fonts, tab navigation, and meaningful links
Why a streamlined user experience matters for hospitals: Patients visiting your hospital’s website may be rushed or anxious. A simplified user experience connects them with the information or resources they need quickly and seamlessly.
Tips for Hospital Website Compliance
Your hospital website will likely have multiple services that collect and store patient data, whether that includes a health portal, appointment tool, or bill payment.
HIPAA is an act created by the American government to protect patient data such as names, phone numbers, email addresses, social security numbers, and medical records.
HITECH extends HIPAA requirements to bring additional benefits and protection to patients. This regulation establishes that patients should always have access to their health information online, and if hospitals do have a data violation, patients should be notified immediately. Depending on the seriousness of the data breach, your hospital may also incur various penalties and fees.
To ensure your website and software solutions not only comply with HIPAA and the HITECH Act but go above and beyond to ensure data protection, you need the following safeguards:
Tech safeguards include encryption software, data backups, and firewalls. Assess the state of your current healthcare cybersecurity system to ensure you have the proper safeguards in place.
Physical safeguards include only granting access to material records or electronic devices with the aforementioned data after proper authorization.
Administrative safeguards include the guidelines your hospital sets up to ensure that internal procedures comply with HIPAA.
Once these safety nets are in place, add a privacy policy statement to your website explaining your commitment to HIPAA and HITECH compliance. Publicizing this statement will help you build trust with current and prospective patients.
How to Maintain Your Hospital Website
Hospital website maintenance is crucial to ensure your site remains a high-performing, accessible, and convenient resource for your audience. Follow these best practices to future-proof and maintain your website over time.
Adopt a continuous improvement approach
Web Design Process Comparison
TraditionalGrowth-Driven
Traditional Waterfall Process
Strategy
Design
Development
Launch
Drawbacks
Rigid & Less FlexibleChanges are difficult and expensive once development begins.
Costly & Time-ConsumingLarge upfront investment with lengthy timelines.
Quickly OutdatedWebsite can become stale shortly after launch.
Growth-Driven Design Cycle
Benefits
Save Time & MoneySmaller initial investment with continuous improvements.
Always Fresh & RelevantContinuous optimization prevents site staleness.
Data-Driven DecisionsInformed improvements based on real user behavior.
Traditional website design and development takes a linear approach, with a clear pathway from strategy to implementation. However, a growth-driven, continuous improvement approach involves an ongoing, iterative process of:
Strategizing new website innovations
Implementing website changes to test your hypotheses
Tracking results and adjusting your approach based on feedback
This perspective pushes you to constantly update your website based on evolving best practices. Plus, you can avoid major site overhauls, which can cost your organization time and money.
Update your website according to accessibility innovations
New accessibility innovations are released constantly, helping to improve the online experience for users with temporary or permanent disabilities. Intelligent eyewear, a hands-free mouse, and AI-powered assistants are just a few of the exciting innovations we’re seeing this year.
Your website maintenance process should include accessibility updates to ensure your site stays usable and functional for all users. Take the time to adjust to the impacts of the following potential changes:
New assistive technology. Innovations in screen reader technology, AI assistants, assistive voice solutions, and other accessible technologies change how individuals interact with your web content. Make sure your website is structured properly, with clear navigation and heading structures, so it’s compatible with all assistive technology.
Accessibility testing techniques. Alongside updates to assistive technology itself, the way web designers can test sites for accessibility constantly evolves as well. Stay up to date on the best automated testing tools available as well as techniques for manually assessing your site. Resources like Kanopi’s guide to accessibility testing can be a huge help because our developers use these tools every day to ensure the sites we build or refresh are completely accessible and compatible with assistive technologies.
Changes to legal requirements. Laws like the Americans with Disabilities Act (ADA) and the Section 508 Amendment to the Rehabilitation Act govern web accessibility in the United States. Keep this legislation in mind as you refresh your website for accessibility. If you want to expand into new markets in other countries, be aware of their accessibility legislation to remain compliant.
Here at Kanopi, we take a holistic approach to web accessibility, learning about your website’s visitors and their unique accessibility needs to build a strategy that works best for your organization. Learn more about our approach in this short video:
Conduct technical fixes
The technical elements of your hospital website play a major role in your users’ online experience. Technical issues can slow down your website and leave it vulnerable to security breaches.
To keep your website in top shape, prioritize fixing the following technical issues:
Broken links. Broken links can hurt your SEO performance and create a negative user experience. Use an automated tool like Semrush or Google Search Console to identify and correct broken links with mass updates.
Security risks. Run core updates for your CMS and plugins or modules, encrypt sensitive data, require strong passwords for CMS users, and enable two-factor website authentication. In addition, host regular security training sessions with your team to ensure everyone is up to date with the latest security risks and best practices.
Slow page loading speed. Measure page load speed using a free tool like Google’s PageSpeed Insights or Lighthouse. Common performance issues include large image files, unused JavaScript or CSS, and large network payloads.
Set up recurring technical reports to get ongoing updates about your site’s health. Continuously monitoring your site and fixing performance issues will help you avoid smaller problems snowballing into major complications down the line.
Update your content
Your website’s content equips your audience with the crucial medical information they need to make informed decisions about their health. Updated, accurate content helps raise your hospital’s authority level and gives more credibility to your institution.
In your website maintenance process, make the following content updates:
SEO updates. Use SEO tools like Ahrefs or Moz to keep an eye on your search engine rankings. If any of your website’s most important pages, like high-value blog posts or your homepage, start slipping in the rankings, make a plan to refresh the content to enhance its SEO appeal. For example, you could better incorporate the main keyword, add more engaging visual elements, or refresh the page with updated health information.
Audience shifts. Your hospital’s core audience and their content preferences may change over time. New people could move into your coverage area with new online medical needs. Or, audience members may begin expressing interest in different blog post topics than what you normally cover. Pay attention to metrics like blog post engagement rates, time spent on each page, and audience demographics to ensure your content aligns with your audience’s interests and needs.
Interactive content additions. Interactive content is on an upward trajectory right now as more consumers seek out these engaging online elements. Interactive content can also lead to 2x the conversion rate of passive (or static) content. Find opportunities to incorporate this content into your hospital website, whether through online health assessments, quizzes, maps, surveys, or polls.
These content updates and the website maintenance process in general are most successful when working with a dedicated web development partner that has expertise and experience in maintaining websites like yours. Read on for an inside look at how the Kanopi team approaches hospital web development support.
How Kanopi’s Hospital Web Development Services Can Help
Kanopi is a top partner for hospitals with a continuous improvement team that has helped develop over 150 active sites. No matter what stage your hospital website is at, our team can conduct a full website redesign project or build it from scratch.
Content management system support tailored to user needs—whether you use Drupal or WordPress as a CMS, we have experts who can customize each platform to align with your organization’s needs and branding.
Custom module/plugin development—if you can’t find the right tool to perform a specific action, our coding team can create it.
WCAG 2.1 AA accessibility standards to ensure that anyone can access and engage with your healthcare services as needed.
Custom integrations for an online health portal or other solutions that can expand your hospital website’s capabilities.
Responsive, mobile-first design because we know that your online hospital services should be accessible from any device, anywhere.
Technical SEO strategy and implementation so that if anyone looks up your hospital’s name, a specific doctor, or a program, your hospital website is the first option on the search results page.
Even after your optimized site is officially launched, we will continue working alongside your hospital to create a website growth plan. This ensures that your site is sustainable for as long as possible and will support your hospital as it evolves.
For more information on website development, check out these resources:
Drupal vs. WordPress: Which One is Right For You? Drupal and WordPress are two popular content management systems that hospitals depend on. Learn which one is right for your organization in this guide!
Inclusive & Accessible Forms. Need to collect information via a form on your website? Forms ask your users to provide personal data, so ensure those forms are inclusive and accessible.
Webinar: Website Best Practices for an Aging Population. Kanopi’s Cliff Persaud discusses the challenges and opportunities facing healthcare providers and how they can ensure their website design meets the needs of aging patients.
Algolia is a powerful search and discovery API for creating fast and relevant search experiences. Designed to optimize user interaction, Algolia enables teams to build and refine custom search functionalities. It offers features like instant search, autocomplete, faceted search, and typo tolerance, ensuring users find what they need quickly and accurately.
Why we like (and use) Algolia
There several compelling reasons why we use Algolia here at Kanopi:
Speed & performance. Algolia provides lightning-fast search capabilities, enhancing the user experience on our websites.
Developer’s perspective: Offloading the search functionality to Algolia instead of relying on the main site database significantly speeds up overall site performance. By handling search queries separately, the primary database experiences reduced load and faster response times, leading to a smoother and more efficient user experience.
Relevance. The advanced search algorithms ensure highly relevant search results, improving user satisfaction and engagement.
Query suggestions. Algolia’s query suggestions feature provides users with real-time search suggestions as they type, enhancing the search experience by predicting and displaying relevant queries. Also, developers or editors can easily rank, add and/or remove query suggestions as needed, ensuring the search interface remains intuitive and relevant.
Customization. Algolia’s flexible API allows us to tailor search functionalities to meet specific client needs and preferences.
Developer’s perspective: Being able to easily customize the frontend to meet design and client expectations is a wonderful thing! Algolia’s ease of customization stands out, thanks to its extensive documentation and examples for adding search functionalities to a site.
Algolia covers all popular JavaScript frameworks, such as React, Vue, Angular, as well as iOS, Android, and vanilla JavaScript. This comprehensive support empowers frontend developers to effortlessly integrate and customize search interfaces to meet specific client requirements.
Scalability. As our clients grow, Algolia scales effortlessly, handling increasing volumes of data and traffic without compromising on performance.
Ease of integration. Algolia integrates seamlessly with various platforms and technologies, including Drupal, making it a perfect fit for our technical stack.
We use Algolia to enhance the search capabilities on our clients’ websites. Here’s a brief overview of our approach:
Search implementation. We integrate Algolia’s search API into the client’s CMS, customizing the search interface to match the website’s design and user needs.
Developer’s perspective: The Search API Algolia module for Drupal allows us to easily set up content for Algolia to build a search index using a method familiar to anyone who’s ever worked with the Drupal Search API.
However, Developers aren’t limited to this one Drupal module for sending data to Algolia. There are actually many ways to push and pull data to Algolia’s service. Developers can also create custom modules to meet specific client search needs if the Search API module doesn’t meet their requirements. The flexibility with which Algolia ingests data enables developers to curate the data before passing it to Algolia, ensuring a tailored and optimized search experience.
Indexing content. We set up and configure indexing rules to ensure all relevant content is searchable. This includes real-time indexing for dynamic content updates.
Developer’s perspective: When using the Drupal Algolia Search API module, any new, updated, or deleted content is immediately pushed to Algolia and can be searched almost instantly. This seamless integration makes indexing both new and existing content easy and efficient.
Search optimization. We fine-tune Algolia’s search settings to prioritize the most relevant results and ensure a seamless user experience.
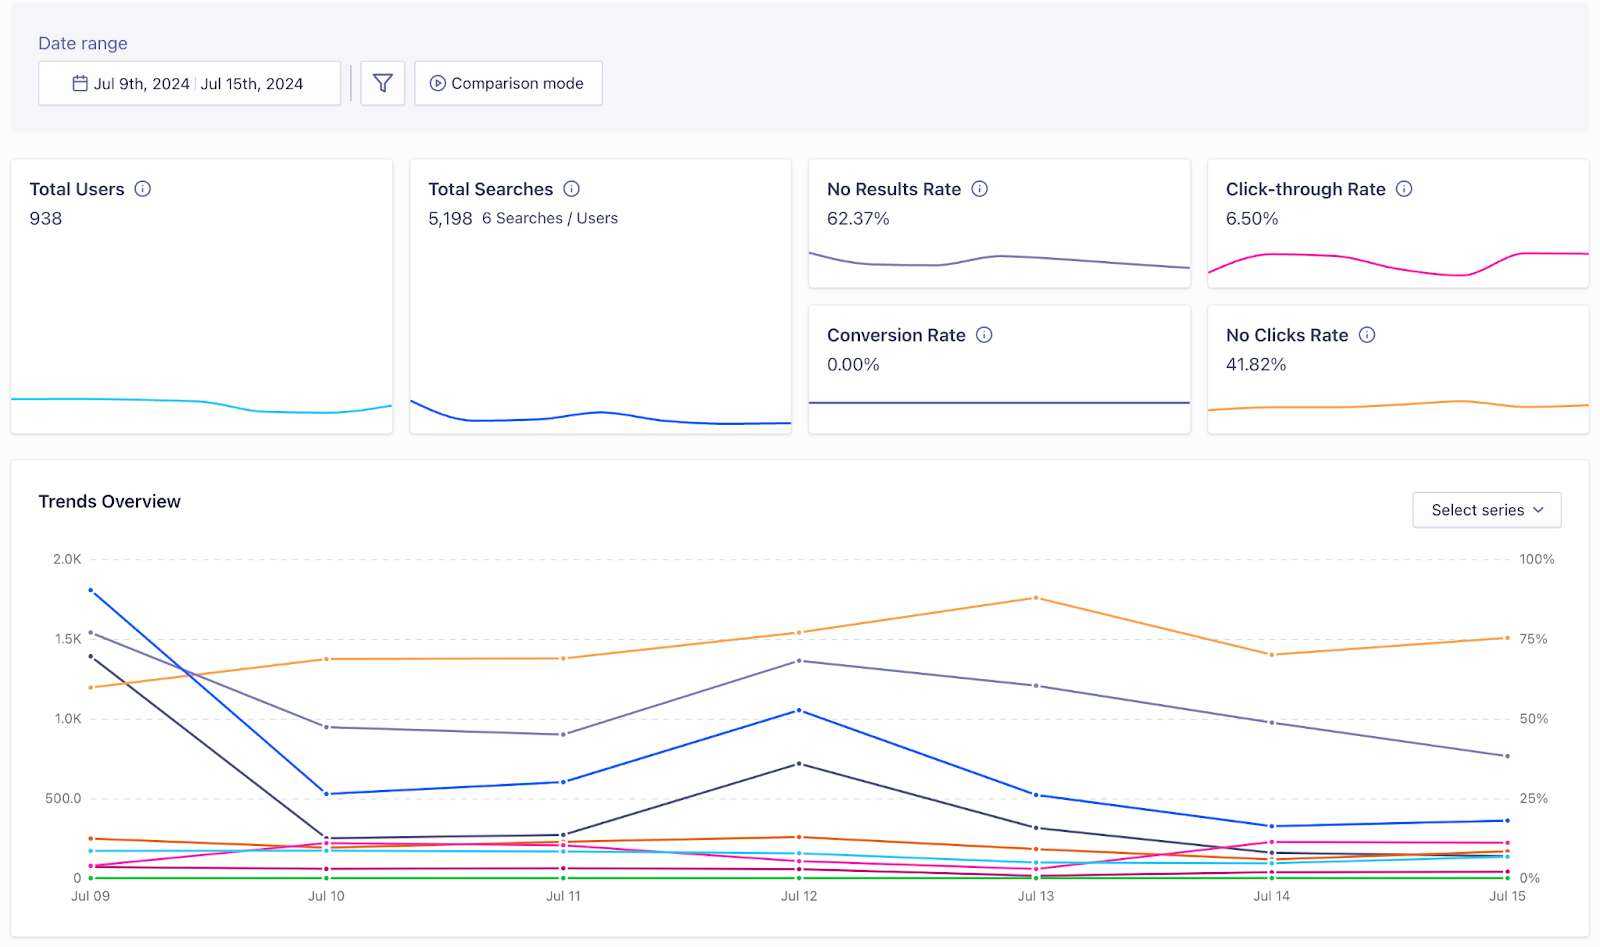
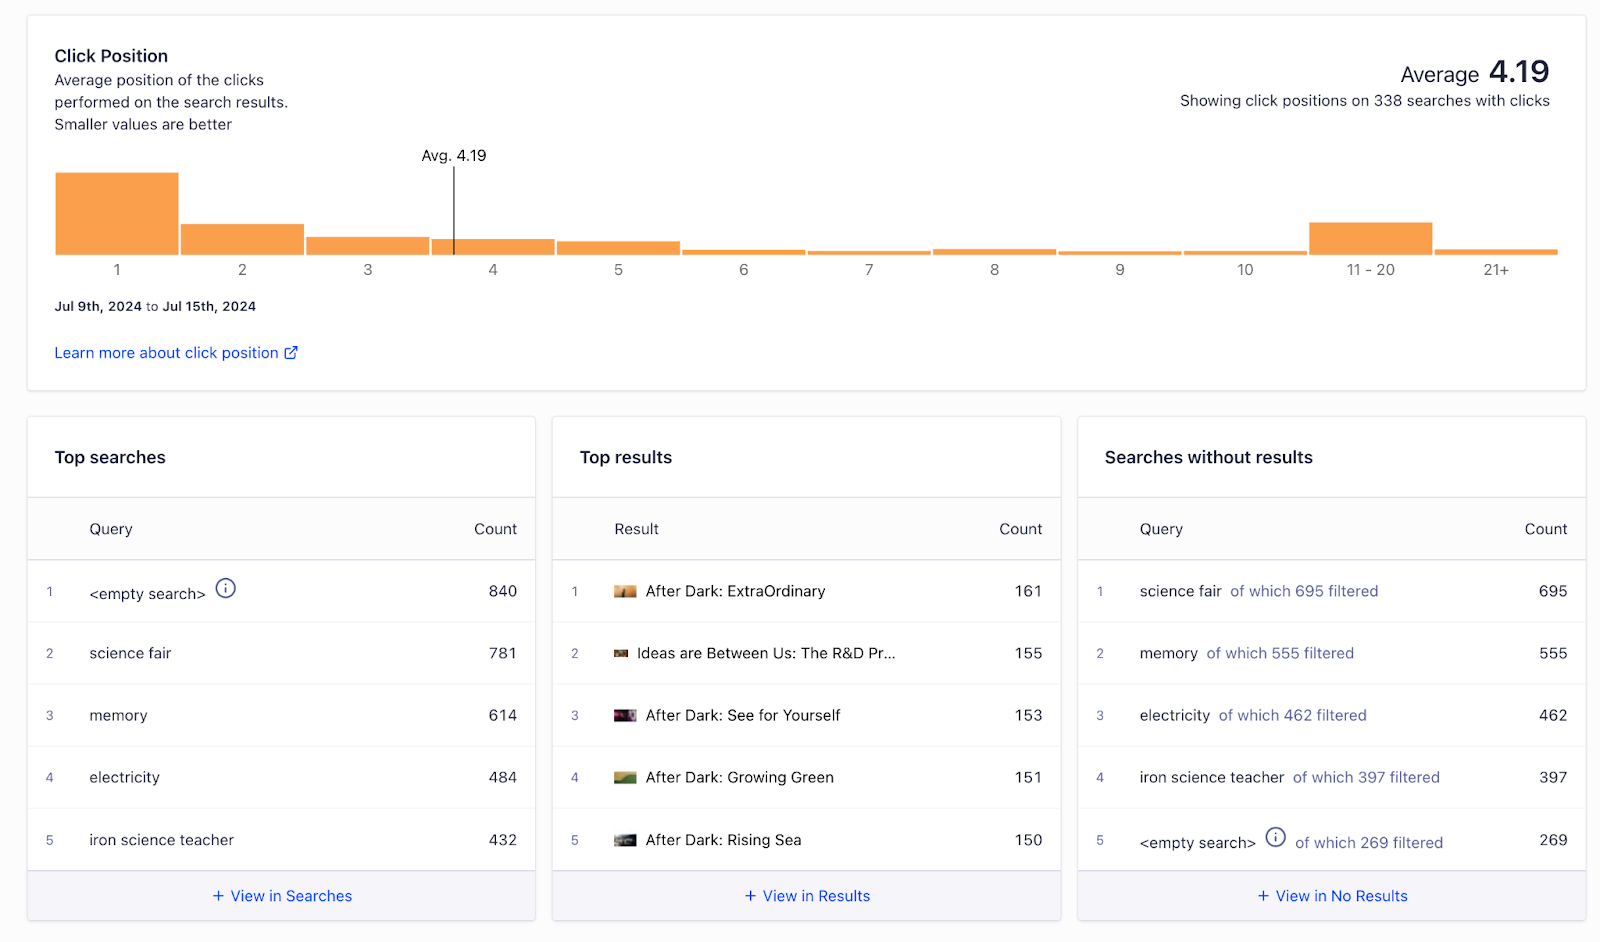
Analytics and refinement. Using Algolia’s built-in analytics, we can continuously monitor search performance and user behavior, making data-driven adjustments to enhance search accuracy and effectiveness.
Using one of our clients — the Exploratorium — as an example, here are images showing examples of Exploratorium’s Algolia Analytics metrics:
Examples of Algolia in action with Exploratorium
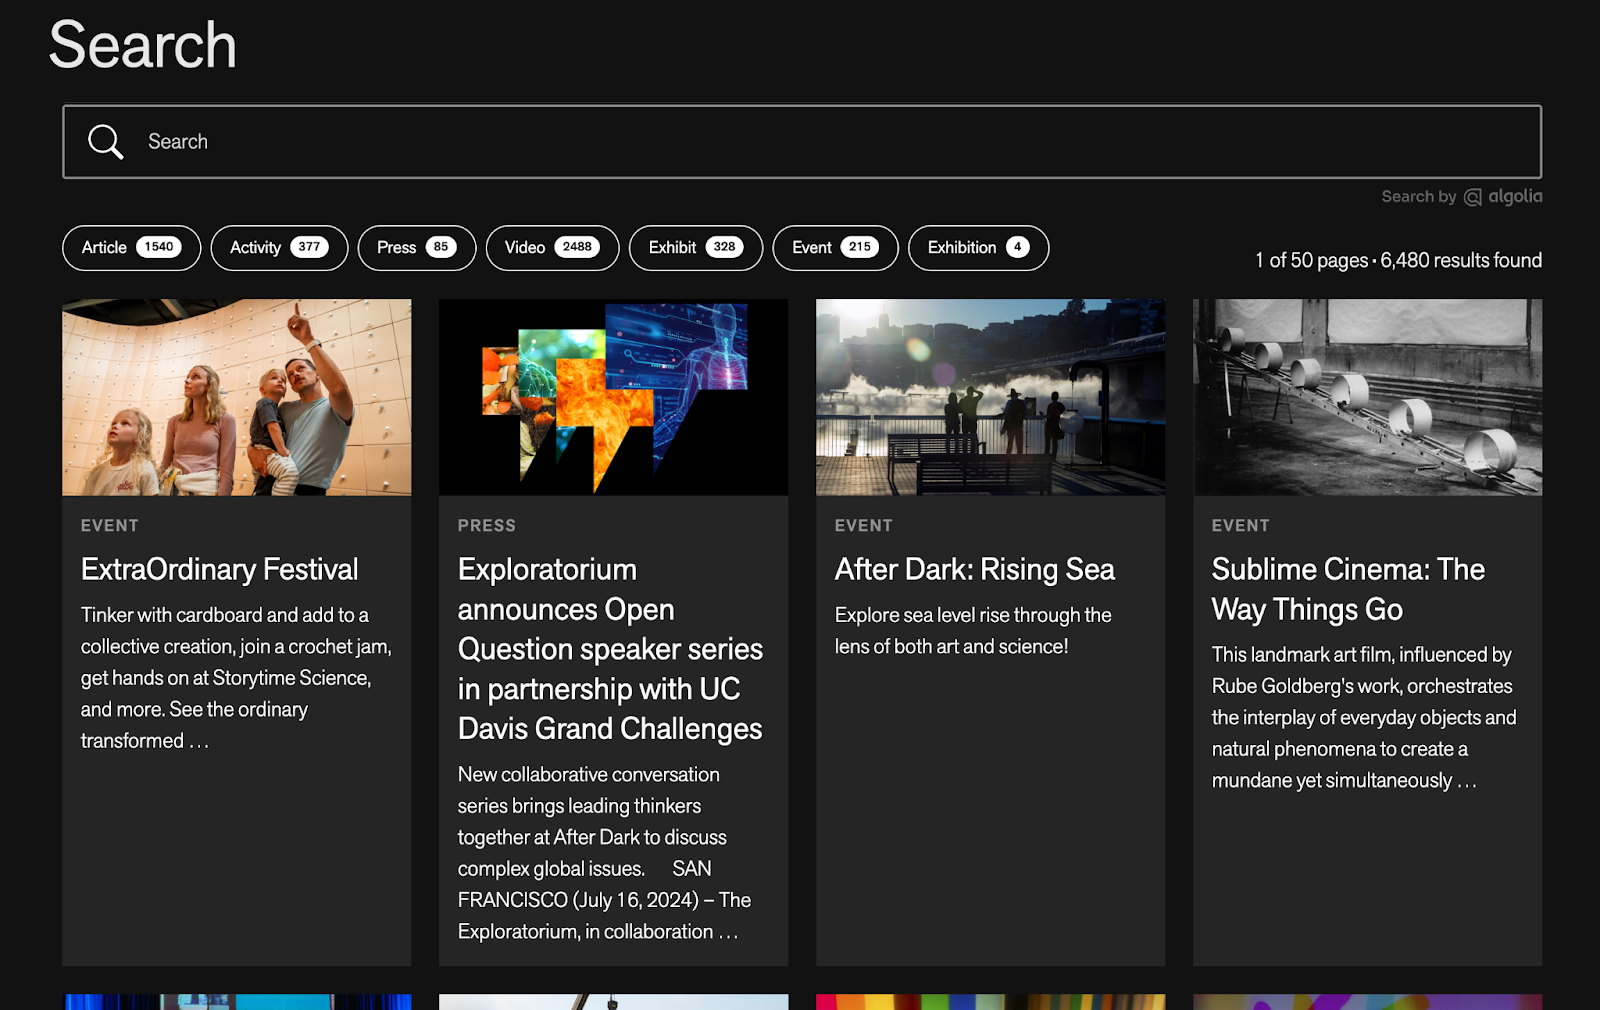
Renowned San Francisco public learning laboratory the Exploratorium needed to revamp their search experience. We used Algolia to create an intuitive, responsive search interface that caters to diverse visitor needs. The improved search functionality has significantly boosted user engagement, search relevancy, and satisfaction. (See the full case study for Exploratorium here.)
Specifically, we used Algolia’s Autocomplete and InstantSearch.js UI libraries:
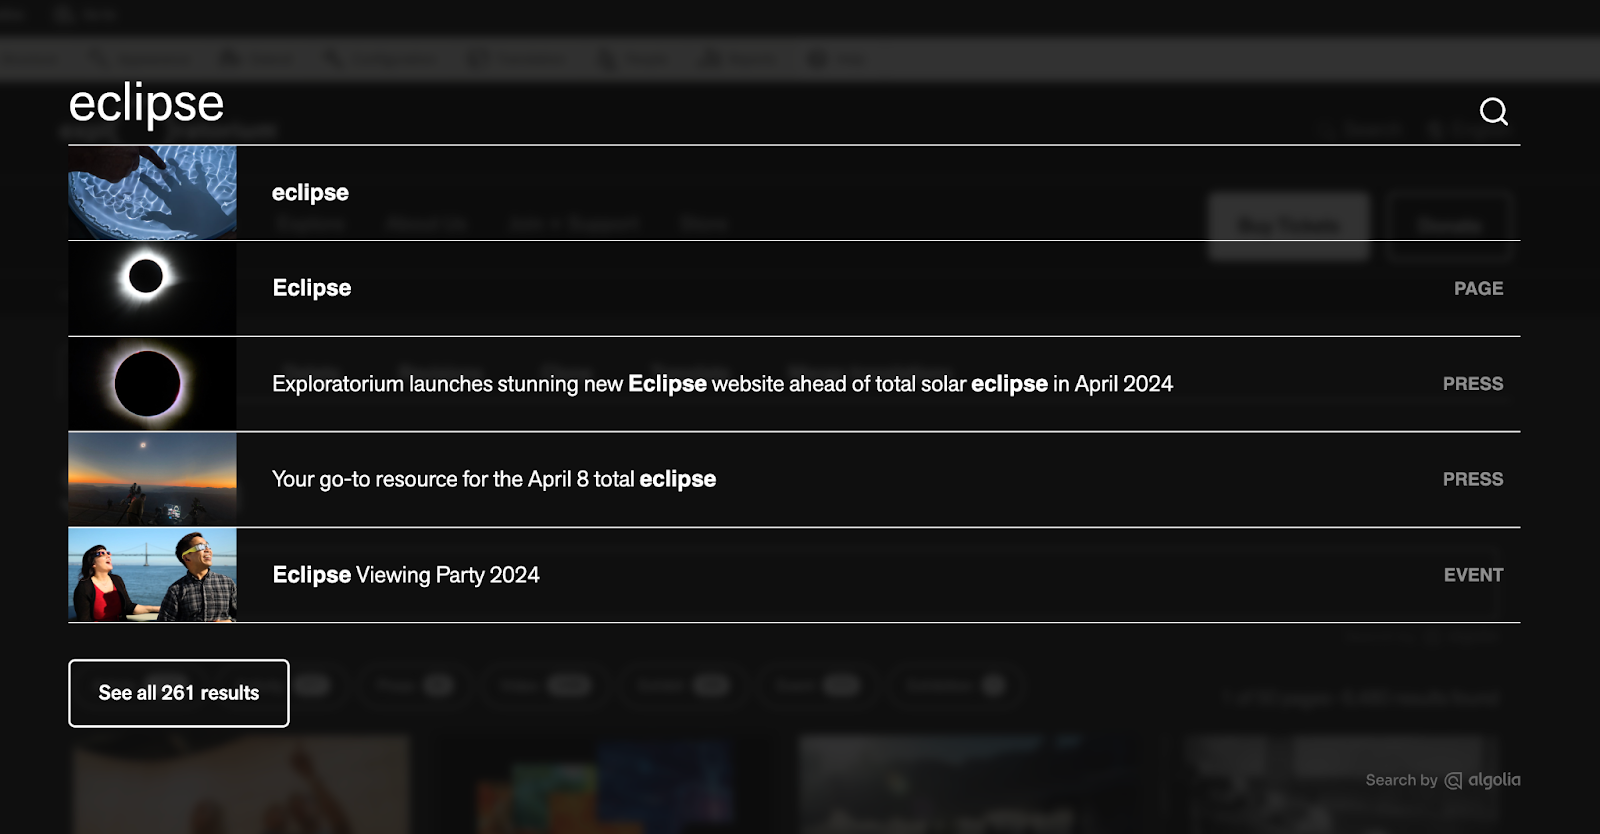
Example of Algolia Autocomplete library
We integrated the Autocomplete library into the header, providing users with real-time suggestions as they type into the input field. This autocomplete feature predicts and displays full terms or results, forming the core of the autocomplete experience.
Six Bug Reporting Best Practices for Manual Quality Assurance Engineers
Kathleen Smith
Manual quality assurance (QA) in web development is the process of manually checking a website or application to identify bugs, usability issues, and design inconsistencies. Typically performed by QA specialists or developers, it ensures a seamless user experience by catching issues that automated tests might miss. In other words, it’s essential to delivering a fully functioning website that works as intended.
However, identifying bugs is only part of the QA job — reporting them effectively is just as critical.
A well-written bug report helps developers understand the issue quickly, saves time, and improves the chances of a fast and accurate fix. In this post, we’ll look at six key characteristics of an actionable bug report.
1. Clear, Descriptive Titles (Think “Obvious” but Helpful)
First impressions matter, and your bug title is the first thing your team will see — so make it count! A good title conveys exactly what the issue is by identifying the specific component, page, or feature affected, along with a concise summary of the problem.
Consistency is key — avoid interchanging terminology (e.g., “Taxonomy” vs. “Taxonomy Term,” which may refer to entirely different things) and stick to the naming conventions established in your CMS or project.
Example Title: “‘Cute Puppy Photo Request’ form can be submitted even when required fields are blank.”
2. Explain How to Reproduce the Issue
Reproducibility is the cornerstone of bug resolution. If developers can’t replicate the issue, they’ll (rightfully) struggle to understand what QA is reporting.
Provide clear, step-by-step instructions in the exact order you performed them. Don’t skip seemingly trivial details, as these can often be critical in reproducing the problem accurately.
Example Steps to Reproduce:
As an anonymous user, navigate to [relevant URL here]
Verify that the “Cute Puppy Photo Request” form is visible
Leave all required fields blank
Click the “Submit” button at the bottom of the form
Note that the form is successfully submitted without validation errors
3. Include Relevant Screenshots or Screen Recordings
Visual aids like screenshots or videos provide context and make it much easier for developers to understand visually complex issues, such as alignment problems or animation glitches. Tools like Scrnli, native OS features, or browser extensions can help capture these details.
For extra impact, consider providing a voiceover for your recordings. There’s nothing like softly narrating QA best practices to soothe developers while they debug.
Pro tip: Include screenshots for any ticket a QA professional touches. Not only does this serve as a handy reference for future troubleshooting, but it can also pinpoint exactly which merge introduced a new bug.
4. Describe the Expected vs. Actual Results
Clearly outlining both the expected and actual outcomes helps distinguish a genuine bug from a feature or misunderstanding. Whether it’s a quick one-liner (“error should not appear”) or a more detailed explanation involving user experience considerations, this context is invaluable.
Example:
Expected Result: After clicking “Submit,” the user should see an error message if the required fields are not filled out.
Actual Result: After clicking “Submit,” the user can submit the form without completing the required fields, and no error message is displayed.
5. Specify the Environment and Configuration
Some bugs occur only in specific environments (we’re looking at you, Safari). Always include details about the browser, OS, device, and CMS or app version where the issue was encountered. This helps prioritize fixes and ensures issues can be replicated under the same conditions.
Example:
Browser: Chrome v95.0
OS: Windows 10 Pro
Device: Desktop
Screen Resolution: 1920×1080
CMS Version: WordPress 6.5
6. Reference Related Bugs or Previous Fixes
Many bugs are related to previous issues or fixes. If something feels familiar, take the time to dig into the backlog or related tickets—it might save hours of investigation. Mentioning related bugs, project-specific issues, or core bugs provides helpful context for developers and ensures nothing falls through the cracks.
Example: “This issue appears to have resurfaced after the ‘Cute Puppy Forms’ module update in ticket #12345.”
Final Thoughts
Effective bug reporting is one of the most valuable skills a QA engineer can bring to a project. Clear, detailed, and organized reports enable developers to address issues quickly, ensuring a better end product. And let’s be honest — developers will secretly thank you for it (even if they never say it out loud).
Let’s say your organization needs a new website. You meet with your team to discuss the best way forward. Some are touting the benefits of an open-source content management system (CMS) like Drupal or WordPress. Meanwhile, others argue that a proprietary system is the right way to go. But you’re the one who has to make the final call. So, which one will it be? In this post, we’ll look at open source vs. proprietary CMS and what each one has to offer.
If you know anything about us, you already know that we strongly prefer open source for a long list of reasons. We’ll get into those reasons below, but we’ll also give proprietary systems a fair shake — promise. Hopefully, the more you know about each option, it will be clear why we’ve built our organization around open source right from day one.
What is a proprietary CMS?
A proprietary CMS is a software platform owned and controlled by a company. Its users need to purchase licenses or subscriptions for access and updates. It typically offers limited customization compared to open-source CMS, with restricted access to the source code.
Organizations that choose the proprietary route usually cite a few main reasons:
Dedicated Support: Proprietary CMS platforms typically have dedicated customer support, offering immediate help with technical issues, bugs, and updates.
(Perceived) Security: With a closed-source environment, clients sometimes have the perception that proprietary CMS platforms have fewer vulnerabilities, since the code is not accessible to the public. The vendor manages security updates and patches. (Below, I’ll get into why this is more about perception than reality.)
Tailored Solutions: Proprietary CMS vendors may offer customized solutions, features, or integrations to meet specific business needs within a particular industry.
Legacy: In many cases, the client is already deeply invested in other proprietary platforms/software from a provider (their suite of office applications for example), so they’ll also use their CMS for the sake of convenience and continuity. There’s a pretty large company whose name starts with ‘M’ that relies heavily on this in their sales pitch.
These benefits, however, often come with trade-offs, such as higher costs and limited flexibility compared to open-source CMS options.
So, what about open source?
Open-source CMS platforms like WordPress, Joomla, and Drupal account for a majority of websites on the internet. WordPress alone powers approximately 62.7% of all sites. They’re also usually more cost-effective to maintain in the long run compared to proprietary CMS platforms for a number of reasons:
For Starters, They’re Free: Open-source platforms like WordPress and Drupal are free to use, eliminating the need for expensive licensing fees associated with proprietary software.
No Vendor Lock-In: With a proprietary CMS, the vendor retains ownership of the code, limiting your control and flexibility. With an open-source CMS, clients own and control the code, meaning full customization and portability is yours. Using open-source software also means you’re not dependent on a single company for updates, support, or hosting.
Flexibility and Customization: Drupal and WordPress offer extensive customization options with thousands of themes, plugins, and modules; users can tailor their websites to meet their needs without being locked into vendor restrictions.
Community Support: Open-source platforms have large, active communities of developers and users who contribute to forums, create plugins/modules, and more. This collective knowledge base can provide faster solutions and innovations.
Continuous Improvement: Open-source platforms are regularly updated with security patches, new features, and enhancements contributed by the community, making them more dynamic than proprietary software, which might have slower release cycles.
Ownership and Control Is All Yours: With open-source software, you have full ownership and control over your website, including the ability to host it anywhere and modify the underlying code. Proprietary systems may impose hosting restrictions and limit access to the source code.
Security and Transparency: Open-source platforms are generally considered to be more secure because the code is publicly available for scrutiny, allowing security experts to identify and patch vulnerabilities quickly. Proprietary systems may be more opaque, making it harder to spot and fix security issues. So while it’s true that many more people have access to open-source code, this results in greater platform security — despite what many proprietary system providers (and their sales teams) would like you to believe.
Scalability: Open-source platforms like Drupal are highly scalable, making them suitable for both small websites and large enterprise-level applications, whereas proprietary solutions may have limitations or require expensive upgrades to scale effectively.
Integration Capabilities: Drupal and WordPress are known for their ability to integrate with a wide range of third-party tools, APIs, and systems, providing more flexibility in building feature-rich websites — while proprietary platforms may restrict integrations or charge extra for them.
Innovation: Open-source platforms often lead in innovation, as developers from all over the world can contribute new ideas and functionalities, fostering a continuous flow of creativity and technical advancement.
It’s your call.
So, returning to our opening paragraph scenario, it’s your call; you have proponents in your organization on each side of the coin. Which do you choose? Do you listen to those team members clamoring for a proprietary CMS and its benefits? Or do you choose the flexibility and efficiency of an open-source platform?
Not that we would openly encourage you to choose one over the other. Good heavens, no! However, if you should decide to go with an open-source CMS — specifically Drupal or WordPress — we have a little motto here at Kanopi:
Never build alone.
Since 2010, we’ve been building websites that meet our clients’ unique needs, whether designing and developing from the ground up or enhancing existing sites with upgrades and CMS migrations. Our approach combines UX research, discovery, and visual design to create a user-friendly digital experience, followed by expert development to bring your vision to life. Even after launch, we provide ongoing support to ensure your site continues to perform at its best. With us as your partner, even the staunchest proprietary fans will be tipping their hats to you.
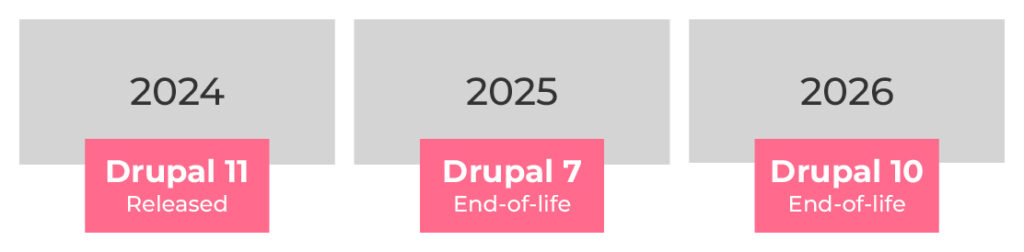
But as they say, all good things must come to an end. According to a Drupal PSA, Drupal 7 will reach its end of life in January 2025, and its farewell leaves many organizations considering their next steps.
D7’s end-of-life (EOL) was originally planned for November 2022, but with the impact of COVID-19 on so many website owners and their budgets, the Drupal maintainers decided to extend the timeline to 2023. Now, a final extension has been made, pushing the timeline again by two years.
Even with this extension, the impending EOL date has a lot of organizations that are dependent on Drupal 7 weighing their options. These organizations can either:
Every website and organization is different. There’s no catch-all answer when it comes to deciding when and how to upgrade your Drupal system. However, it’s highly recommended that organizations still using Drupal 7 consider moving to Drupal 11. This gives you the greatest access to new features and functionality to ensure your website is at the top of its game.
In this blog post, we’ll outline the pros and cons of each option and describe the process of switching to Drupal 11.
Drupal 7 End of Life: Frequently Asked Questions
What does Drupal end of life mean?
When software reaches its end-of-life date, it will no longer receive bug fixes or security updates from the Drupal community and security team. This also includes the modules that are used!
How long will Drupal 7 be supported?
Previously, Drupal 7’s end-of-life was scheduled for November 2023. In June of 2023, Drupal extended the deadline to January 5, 2025. After this time, the Drupal Security team will no longer provide support or Security Advisories for Drupal 7.
Is Drupal 7 still supported?
Yes. Drupal 7 will still be supported until January 5, 2025. Even though this version is a decade old, its end-of-life does not mean the end of your site.
Once the community stops supporting Drupal 7 after EOL, a group of approved and vetted vendors can continue to provide security updates for Drupal 7 core and certain contrib modules under the Drupal 7 Vendor Extended Support program.
What is the difference between all Drupal versions?
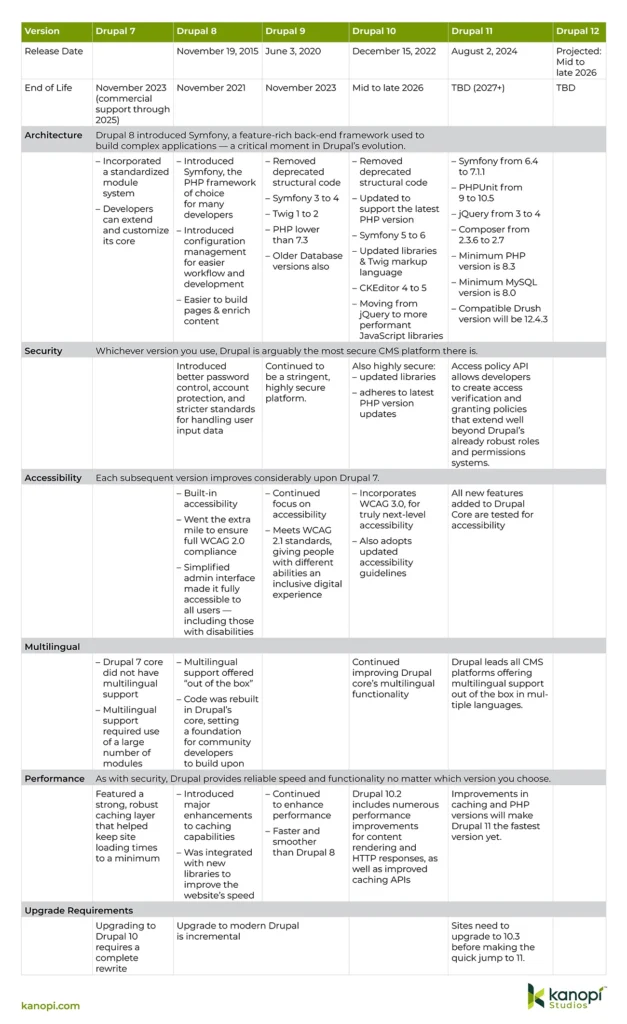
Currently, Drupal 7, 10, and 11 are supported. Drupal 8 and 9 both reached their end of life and are no longer supported. Drupal 11 is the most recent version.
When did Drupal 11 launch?
Drupal 11 launched in August 2024. This version offers helpful new features, better workflows, and greater flexibility for website builders.
What do you need to do to prepare to get out of Drupal 7?
If you’re ready to transition away from Drupal 7, you’ll need to ensure your team is aligned and ready to take on the next steps. To prepare for an upgrade, you should:
Conduct technical mapping. When picking new modules or new features, keep in mind that you’re planning for the future. Do you have a clear update path for when you upgrade to D11 (and beyond)? Check out Kanopi’s Drupal 7 to 10 migration guide for a full sequence of steps to follow (you’ll need to upgrade to Drupal 10.3 before launching a D11 migration).
Conduct a content audit. A content audit helps determine what should stay and what should go on your site. This is especially helpful when it comes time to migrate to a new site.
Identify stakeholders. You’ll likely have several members of your team involved in the steps needed to update your site. Make note of who will be responsible for what and how you’ll start the process.
Determine your budget. Whether you migrate to D11 or move to an entirely new CMS, you’ll need to set a realistic budget to ensure you can complete the project.
Drupal 7 End of Life Options
To upgrade or not to upgrade. That is the question…
The path after Drupal 7 is not a one-size-fits-all process. You have several other paths to choose from regarding the next steps to take. Here are the options to consider:
1. Continue using Drupal 7
Your website won’t cease to exist after Drupal 7’s EOL date, so you can continue using the system for an extended period. This choice is recommended for organizations that need a bit more time to gather the resources and budget needed to switch to D11 or a new CMS.
Pros
Your modules will still continue functioning.
Ongoing support and technical expertise from a partner like Kanopi can help support your site until you’re ready to migrate.
Cons
There won’t be any security fixes.
You may be on your own to fix any modules or integrations that stop working.
You may miss out on innovative new features.
2. Upgrade from Drupal 7 to 11
For organizations that are ready to upgrade their site and take advantage of new functionality and security features, migrating to Drupal 11 is the way to go.
Pros
The powerful migration module has many tools to help developers migrate even the most complex Drupal 7 website to Drupal 11.
If you’re already considering a website redesign, you can start fresh on Drupal 11 and have time to plan.
Cons
It could be costly, depending on the complexity of your site. An upgrade to Drupal 11 from Drupal 7 will require a developer to create a migration, meaning a brand new website needs to be built in Drupal 11. All content from your current Drupal 7 will be migrated to the new site or rebuilt.
3. Move to an entirely new CMS
This option only makes sense if you have the funds to carry out an extreme rebuild. But if your site is very simple (for example, a blog) and doesn’t require many features or functionality, moving your legacy Drupal 7 to a CMS like WordPress can be a very cost-effective solution.
You can use the transition as an opportunity to launch a full brand refresh.
Cons
If your site is more advanced, it can be costly and time-consuming to rebuild it on an entirely new platform.
To help decide which path to take, consider your organization’s:
Budget: If your D7 site is complex, do you have the funds needed to upgrade to D11 or move to a new CMS?
Time constraints: Does your team have enough time to devote to a website rebuild? Will you have more or less free time in the coming months?
Goals: Do you want to expand your website in the future to drive more conversions? Are you interested in modernizing your website or updating your brand?
If you’re not ready to make a decision at this exact moment, some agencies and providers can keep your D7 website updated and move you to Drupal 7 long-term support.
You’ll have to rebuild eventually. But, by choosing a support package, you can take the time you need to make a strategic decision, as well as buy some time to allow funds to free up.
Kanopi’s Drupal 7 End of Life and Support Package
At Kanopi, we’re here to help Drupal 7 users until you’re ready to make the jump. We offer solutions for organizations who decide to stay on Drupal 7 past its EOL and those ready to transition to Drupal 11.
For those who decide to remain on Drupal 7 for the time being, there is some good news. When D7 reaches its end of life, Drupal users will not see any immediate difference from the front-end perspective, and neither will your site visitors! In the back-end of your Drupal site, the platform and modules will begin to display as “Unsupported,” but everything else will essentially continue to work as it had previously.
By choosing Kanopi as your long-term support provider, we patch and maximize the value of your Drupal 7 investment for as long as possible—with the lowest level of financial investment until you are ready to move to D11.
Our Drupal 7 support services include:
A continuous improvement approach: Instead of large structural changes, we work on small incremental changes that support your budget. Our services include module and plugin upgrades, bug fixes and security patches, updating content types/views, and more.
A website growth plan: In addition to keeping your D7 site supported beyond EOL, we also work closely with you to future proof your site. We create a roadmap for exactly how you can increase conversions for your organization using your website
Support and security: Kanopi currently supports 150+ Drupal 7 domains. We work to keep their sites healthy until they’re ready for an upgrade.
If you’re interested in learning more about our D7 support plans, contact the Kanopi team here. We can help you determine the best path forward based on your goals.
Transition to Drupal 11 with Kanopi
For most organizations, transitioning to Drupal 11 is the recommended path to getting the most value out of your website. Making the switch allows you to stay ahead of the curve and ensure your website takes advantage of the security tools and advanced features of D11.
Upgrading your Drupal site from D7 to D11 is a more involved process than traditional upgrades because you’ll have to transfer all of your data to a new Drupal 11 site. Plus, before you can launch your Drupal 11 site, you must update to Drupal 10.3. As Drupal explains, “Sites running 10.2.x or earlier versions must first update to 10.3.0 or later prior to updating to Drupal 11, because all core updates added prior to 10.3.0 have been removed. If any modules or themes have been removed you may use the respective contributed project instead.”
Audit your Drupal 7 site. Review all types of site functionality in this audit, including your modules, content types, paragraphs, etc. This can help you determine where you stand currently and if you should conduct any maintenance before upgrading your site.
Identify necessary redirects to keep your SEO rankings. Identify top-performing content and determine whether you’ll need to implement a redirect to maintain SEO performance.
Create a backup site copy. This will serve as a migration source to ensure everything is in the right place.
Review hosting for technical requirements. Ensure your website host can support the minimum technical requirement of PHP 8.1. Also, review your host for performance elements such as speed, security, and reliability.
Migrate your site’s content. Determine which content types you’d like to maintain or alter, then let your developer initiate the migration.
Upgrade your themes and modules. Choose the right theme for your organization, add your custom features, and organize your content.
Finalize migration, deploy, and run tests. Identify any issues or areas for improvement and test your site until you get it right.
Once you’re on Drupal 10, you’ll have to take a few additional steps to prepare for Drupal 11. Resolve themes and modules that were deprecated in Drupal 10 and removed from Drupal 11 and update contributed modules and projects to ensure compatibility in Drupal 11.
Review the rest of the complete guide for in-depth tips on the common considerations and challenges organizations face when upgrading their Drupal 7 sites to Drupal 10 and eventually 11.
Making the Most of Your Site Upgrade
If you decide to make the leap to Drupal 11, congratulations! This is an exciting moment in your web design journey.
However, you may feel apprehensive ahead of the migration process. Of course, you want your new site to be successful in driving conversions and engaging audience members, and you don’t want to lose any vital data along the way.
Make the most of your site upgrade by:
Using this opportunity to launch a full brand refresh, if desired. You’re already creating a new website for your organization. Why not use this opportunity to refresh your brand? Consider the elements of your brand that could use updating, such as your logo, color palette, fonts, or imagery. Incorporate these fresh elements as you update your site to Drupal 11.
Upgrading your site in multiple ways, including accessibility and user experience. Does your website incorporate the latest accessibility guidance? How about user experience best practices? As you craft your Drupal 11 site, keep in mind how you can optimize your site for accessibility and usability. For example, can you simplify your navigation menu? Can you increase text contrast to assist people with visual impairments?
Taking advantage of Drupal 11’s innovative tools. D11’s innovative content staging workflows, simplified front-end development, and configuration flexibility make the platform much more user-friendly and moldable for developers. Use these tools to give your website the design elements and innovative features that you always wanted to offer.
Testing your new site every step of the way to check for issues or roadblocks. Conduct frequent tests to determine if everything is working as it should. This way, you can identify roadblocks and address them before they become detrimental to your ability to connect with audience members.
Reaching out to web development professionals for help. If you feel overwhelmed by the task ahead of you when it comes to updating your Drupal site, don’t panic. Website development professionals like our team at Kanopi can help ensure your upgrade runs smoothly and you’re making the most of Drupal 11’s advanced features.
These tips will help you make the most of your upgrade and move into the future with a more well-rounded, advanced website.
How Kanopi Has Helped D7 Clients
Kanopi offers a variety of website growth plans, allowing you to choose the path that best suits your needs and goals. These plans range from a Drupal 7 transition plan to technical SEO strategies and fully customized plans.
If you’re ready to start the migration process, we’re happy to help. Our web design professionals at Kanopi are experts in Drupal planning and development. Each team member has an average of 11 years of experience in Drupal Development, and several of them are Acquia and Pantheon certified professionals. We are also a supporting partner of the Drupal Association, regularly contribute to the Drupal Project, and are one of the main organizers of BADCamp.
After all, you’ve probably heard the news by now; as of January 5th, 2025, everyone’s beloved, trusted Drupal version 7 will reach its end-of-life. If you haven’t done so already, this means it’s time to start thinking about the ‘m’ word — yup, migration — to a newer version.
Modern Drupal’s versions 8, 9, 10, and the newly released 11 are similar in many ways, yet very different in others. The Drupal 7 migration process is kind of similar to finally trading in your trusty old well-worn VW camper van for a brand new Porsche. As you can imagine, a transition of such magnitude could be a tad jarring for some — not to mention a wee bit confusing.
That’s why we’ve created this handy infographic, to give you an overview of the key differences between each modern Drupal version, their respective functionalities, and how they solve specific business needs.
What about Drupal 8 & 9?
Since these versions have both reached their end-of-life, there’s no long term support for them. We’ve still included them in our comparison, since their features are integral to understanding the path of version 10 and beyond; however, we don’t recommend them for new builds or upgrades.
The one thing to keep in mind is that anything higher than Drupal 8 is part of Drupal’s composable future — i.e., not only can Drupal integrate with virtually any business or marcom software or service, but it in itself is composable. Taking the best open source tools — CKEditor, Symfony, and Twig, for example — allows modern Drupal to keep innovating and improving while keeping your website’s appearance and functionality intact.
Drupal remains an excellent platform, and its newest releases demonstrate its commitment to staying current and providing the best possible experience to its users. It’s also incredibly complex, which is why any successful migration from Drupal 7 will involve a great deal of planning and resources — not to mention expertise. That’s why it’s highly recommended to work with a web developer, whether as part of your organization or a third-party web development firm.
Where does Drupal CMS fit in?
Drupal CMS aims to make Drupal more accessible to a broader, less technical audience while keeping the platform feature-rich. Rather than downloading and installing the latest version of Drupal, a user who wants to spin up a Drupal site quickly can instead download Drupal CMS for an easy-to-use, out-of-the-box experience. This makes it easier than ever for users to go from installation to a fully functional website, even if they have little to no prior Drupal experience. Drupal CMS comes pre-packaged with carefully curated “recipes” that cater to everyday use cases. We’ve written about Drupal CMS here.
When searching for the right Drupal partner, it’s helpful to find an organization with experienced developers who contribute to the project on an ongoing basis. At Kanopi Studios, we provide Drupal development services for all types of organizations, including nonprofits, corporations, healthcare organizations, and higher education institutions.
We’ve also written several blog posts about the various Drupal versions and their upgrade paths: