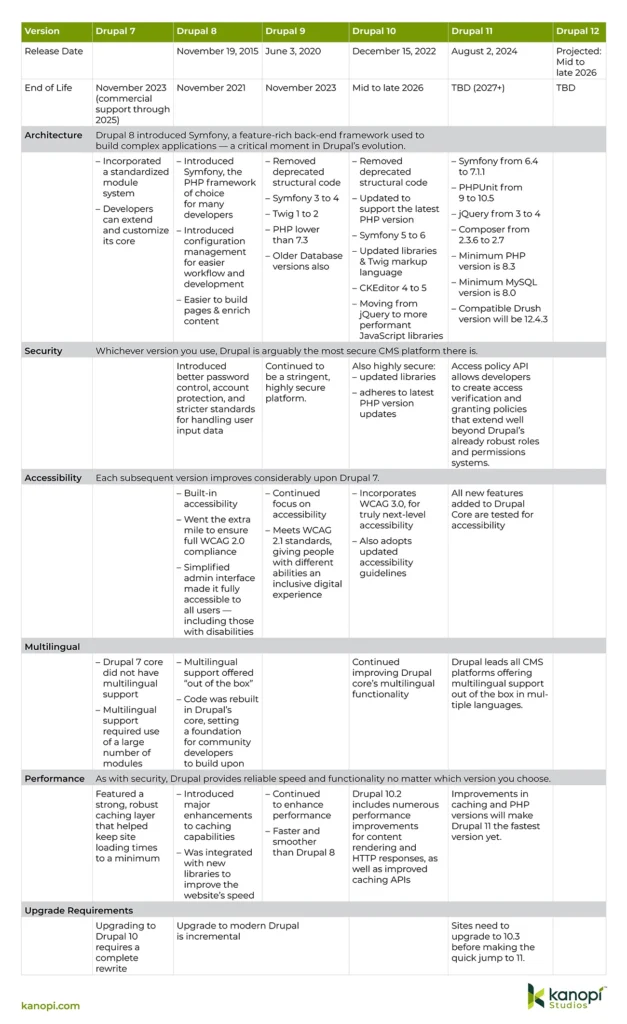
After all, you’ve probably heard the news by now; as of January 5th, 2025, everyone’s beloved, trusted Drupal version 7 will reach its end-of-life. If you haven’t done so already, this means it’s time to start thinking about the ‘m’ word — yup, migration — to a newer version.
Modern Drupal’s versions 8, 9, 10, and the newly released 11 are similar in many ways, yet very different in others. The Drupal 7 migration process is kind of similar to finally trading in your trusty old well-worn VW camper van for a brand new Porsche. As you can imagine, a transition of such magnitude could be a tad jarring for some — not to mention a wee bit confusing.
That’s why we’ve created this handy infographic, to give you an overview of the key differences between each modern Drupal version, their respective functionalities, and how they solve specific business needs.
What about Drupal 8 & 9?
Since these versions have both reached their end-of-life, there’s no long term support for them. We’ve still included them in our comparison, since their features are integral to understanding the path of version 10 and beyond; however, we don’t recommend them for new builds or upgrades.
The one thing to keep in mind is that anything higher than Drupal 8 is part of Drupal’s composable future — i.e., not only can Drupal integrate with virtually any business or marcom software or service, but it in itself is composable. Taking the best open source tools — CKEditor, Symfony, and Twig, for example — allows modern Drupal to keep innovating and improving while keeping your website’s appearance and functionality intact.
Drupal remains an excellent platform, and its newest releases demonstrate its commitment to staying current and providing the best possible experience to its users. It’s also incredibly complex, which is why any successful migration from Drupal 7 will involve a great deal of planning and resources — not to mention expertise. That’s why it’s highly recommended to work with a web developer, whether as part of your organization or a third-party web development firm.
When searching for the right Drupal partner, it’s helpful to find an organization with experienced developers who contribute to the project on an ongoing basis. At Kanopi Studios, we provide Drupal development services for all types of organizations, including nonprofits, corporations, healthcare organizations, and higher education institutions.
We’ve also written several blog posts about the various Drupal versions and their upgrade paths:
In Drupal 10.3, the DefaultContent API was added to Drupal core as part of the experimental Recipes APIs. These APIs allow Drupal to create content from files that are part of a recipe.
This content that we programmatically create isn’t intended for deploying or migrating content, we have the Workspaces and other modules for that.
Instead, it can be a great tool in our toolkit for creating demos and test content, while freeing developers and testers from the drudgery of repetitive content creation.
How did we get here?
Starting back in 2011, a group of open-source Drupal developers started working on a new install profile for Drupal called Snowman. Instead of having a generic and unopinionated starting point, the idea behind Snowman was that it wanted to provide a ready-to-use Drupal site tailored for a specific use case.
While we added a way in core to consume content config files from recipes, we are still at the start of what core can do, and mid-journey of what the contrib module aims to do.
Until the recent interest from the Recipes Initiative team, the Default Content module has always been used for creating default content configuration files for custom modules and install profiles. You could create content on a local site, export it to your module or a module in an install profile, and when that module was enabled (or a site was started from the install profile), and you installed the default content module as a dependency, you would get your content imported. This all still works exactly as it always has, and now it can also be used with recipes.
Drupal Recipes are a framework and set of tools for automating the configuration of a site. They allow developers to rapidly configure entities, fields, and other settings. A recipe can be applied to any number of different sites. This means creating multiple sites can be achieved faster and with a greater degree of consistency in how they are configured. A great deal of human error and forgetfulness can be avoided by using Recipes, particularly for repetitive config. (Check out my comprehensive guide to Drupal recipes.)
Using the Default Content module
The export process is the same for modules and recipes. Let’s review that now.
Getting set up
Install the module as you normally would. Since I am using the module for creating content for recipes, I install it in the dev section of my composer requirements as I do not need it in production.
composer require drupal/default_content –dev
And enable the module:
drush en -y default_content
The module doesn’t have a user interface. Instead, it provides drush commands that can be run to export content.
What can we export?
Out of the box, we can export the following entity types:
Content type nodes:node <node id>
Taxonomy Terms:taxonomy_term <taxonomy term id>
Files:file <file id>
Media:media <media id>
Menu Links:menu_link_content <menu link id>
Content blocks:block_content <block id>
Shortcuts:shortcut <shortcut id>
At this time, there isn’t a way to export by bundle type, think all nodes of type Article, or all menu links from the main menu, but there is a patch for it.
Let’s take a look at the three commands that the module provides to export content.
Default content drush commands
default-content-export-references
Exports an entity and all its referenced entities. This is my go to command as it helps you export referenced media, files, taxonomy terms, and users from the parent node.
Alias:
dcer
Arguments:
entity_type – The entity type to export.
entity_id – The ID of the entity to export
One of these arguments is required.
Options:
folder – The module or recipe’s content folder to export to. Entities are automatically grouped by entity type into directories.
Examples:
# Exports node 123 and all its dependencies.
# To a module:
drush dcer node 123 module_name

# To a recipe:
drush dcer node 123 --folder=recipes/recipe_name/content

# Export all nodes and all their dependencies.
drush dcer node --folder=modules/custom/my_custom_module/content
default-content-export
Exports a single entity. If you want to manage your own dependencies.
Alias:
dce
Arguments:
entity_type – The entity type to export.
entity_id – The ID of the entity to export
Both of these arguments are required.
Options:
file – Write out the exported content to a file instead of stdout
Examples:
# Exports node 123 only. You are responsible to export dependencies.
drush dce node 123 module_name
default-content-export-module
Exports all the content defined in a module info file. This is most helpful for distribution and install profile maintainers where they would want to maintain and update default content from a canonical source.
Alias:
dcem
Arguments:
module – The machine name of the module
The argument is required.
Options:
None
Examples:
# Exports all the content defined in a module info file.
drush dcem module_name

# The module's info file would need to have a section like this:
default_content:
  node:
	- c9a89616-7057-4971-8337-555e425ed782
	- b6d6d9fd-4f28-4918-b100-ffcfb15c9374
  file:
	- 59674274-f1f5-4d6a-be00-fecedfde6534
	- 0fab901d-36ba-4bfd-9b00-d6617ffc2f1f
  media:
	- ee63912a-6276-4081-93af-63ca66285594
	- bcb3c719-e266-45c1-8b90-8f630f86dcc7
  menu_link_content:
	- 9fbb684c-156d-49d6-b24b-755501b434e6
	- 19f38567-4051-4682-bf00-a4f19de48a01
  block_content:
	- af171e09-fcb2-4d93-a94d-77dc61aab213
	- a608987c-1b74-442b-b900-a54f40cda661
Creating a Drupal recipe with Default content
So let’s create a recipe that can store default content we can send to a test server so our QA engineer can test. We’ve created a node that has our new feature on our local environment. Rather than having to rebuild that page manually, we will export the content, and apply the recipe after it has been deployed.
Create the recipe structure
We keep our recipes in the recommended folder above the webroot.
You can manually create a recipe folder, the content folder, and a recipe.yml file or use the command line:
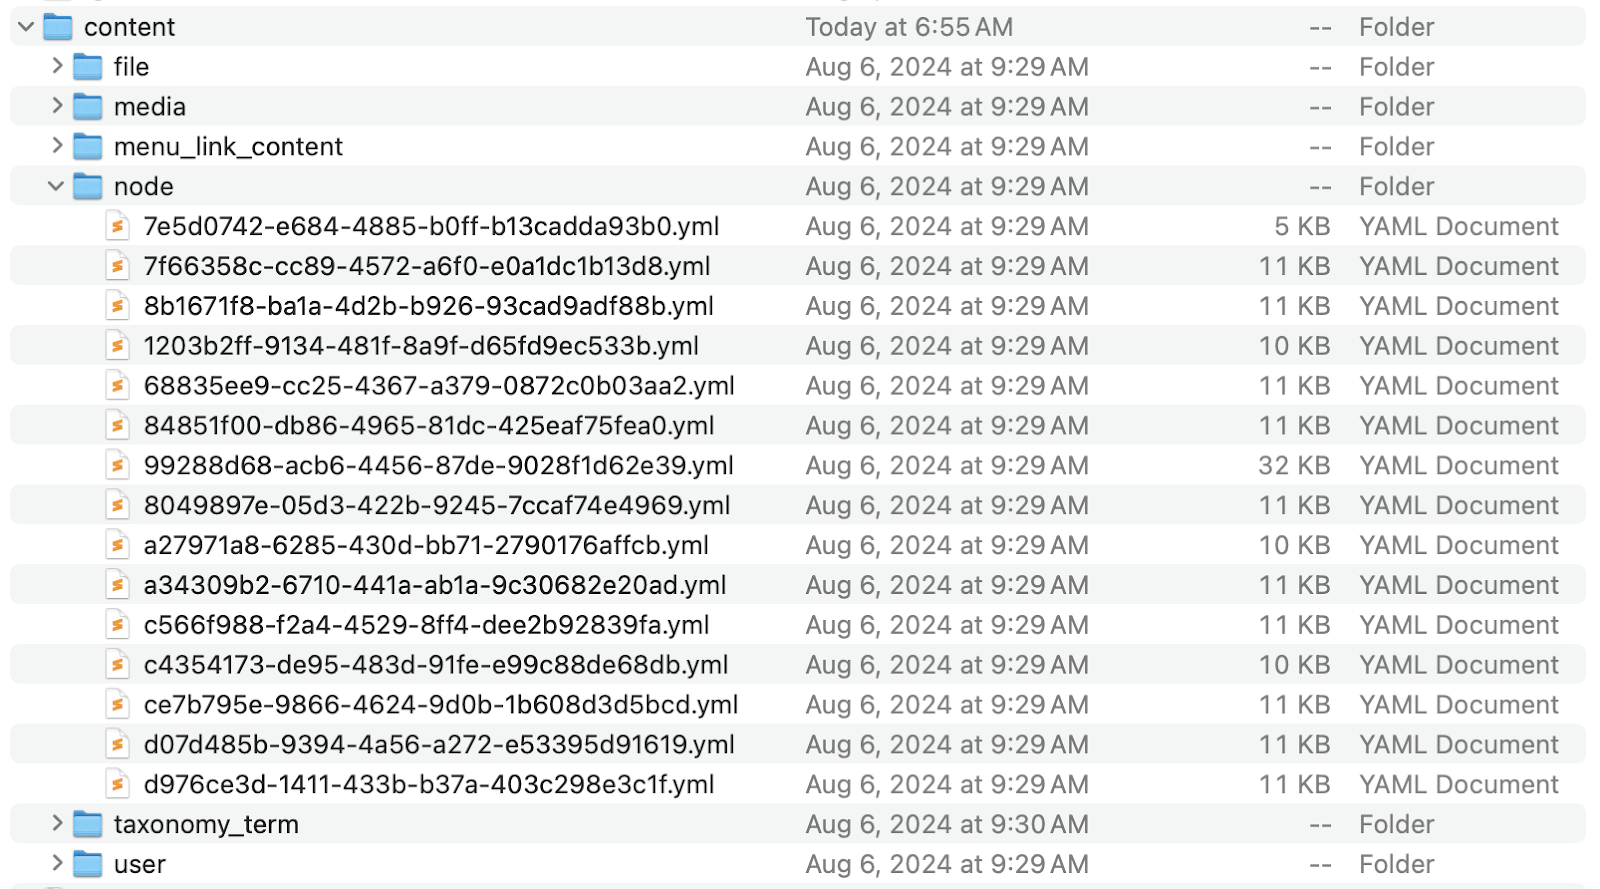
Using the drush commands above, usually the dcer command to export the content you need. Verify in your /content folder that you now have the entities you expect. It should look something like this:
We can now uninstall the Default Content module from our local environment.
Normally we just use recipes in our local development environments and deploy the resulting config, but when leveraging the Default Content module in your recipes, you will deploy them to your server.
Once deployed and applied on your site, you’ll probably want to remove your recipe in a subsequent pull request as you don’t need it in production.
Commit and deploy your new recipe along with your code changes as you normally would.
Applying the recipe
Once your deployment has finished, you can use Drupal core’s recipe script to apply the recipe. If you have cli access to your server, from the webroot you can run:
This uses the recipe PHP script from Drupal to apply the recipe from its current location. The -v flag prints verbose information during the application process.
If you are using Drush 13 or above, they added a recipe command which is a wrapper around the core script.
drush recipe ../recipes/recipe-name -v
If you are on Pantheon, you can user Terminus to run either command:
Verify the content has been created as expected and have your PMs and clients rejoice in the fact that you saved them some time having to recreate it!
What Default content isn’t made for
Default content is not meant to be a replacement for content deployment solutions. It can be a good starting point on new sites. It’s great for demo sites, and quality assurance and user acceptance testing, but there are better solutions like the Workspaces module in Drupal core that allow for you to stage content and deploy it later.
One of the biggest reasons is that we don’t know what the IDs will be on the destination site. You may have started out with the same database, but there is a good chance that the IDs have been increased on the production site by content editors adding new articles or pages.
You can also apply a recipe multiple times, or install and uninstall a module and add that default content again. There are issues in the module’s queue to address some of these situations, but work still needs to be done to improve the processes.
What’s next?
There are plenty of issues in the module’s issue queue to improve the quality and functionality of Default content, and the eleven year old Support default content entities core issue that has recently won some success thanks to the Recipes initiative.
I’d love to hear your thoughts and feedback on how you are using Default Content, or how you plan on using it! Please reach out to me in the Drupal Slack or on LinkedIn.
The next major Drupal version was just released — laying the foundation for its future.
Drupal 11 was recently released on Drupal’s timeline. Unlike previous major versions, where releases needed to accommodate underlying technologies’ end of life like Symfony, Drupal 11 was released because it was the right time to solidify new features and free us from deprecated code so development can continue to improve functionality and performance.
The initial Drupal 11 release has the same functionality as Drupal 10.3, to which most Drupal sites should have been upgraded in the spring — although Drupal 11 does have a few differences. For example:
Instead of having deprecated code and modules identified, they are now removed.
Dependencies and dependency requirements were upgraded. The minimum PHP version for Drupal 11 is 8.3, which brings impressive performance and a better developer experience. jQuery, Symfony, and PHPUnit were also upgraded to allow for code and testing modernization and performance.
As Drupal works to become more performant and valuable as a framework, overly specialized or underutilized modules are continually being removed from core. This includes the Actions UI, Book, Tracker, Forum, Statistics, and Tour modules.
However, they aren’t gone! Instead, they’ve been moved to the Drupal contrib space. If your website relies on any of these modules, a simple command can switch versions. The great news is that with new contrib maintainers, development will continue to improve these modules.
The Tour module, which I presented about at DrupalCon Europe 2021, has already seen several improvements and bug fixes. It has combined my Tour Enhancements module and the Tour UI module in its 2.x release.
New Features in Drupal 11
Drupal 10.3 and 11 include several significant new features and improvements, including:
The Drupal core Workspace module moved from being experimental to stable. You can create multiple workspaces for development, testing, and staging with Workspaces. Each workspace can have its own set of configurations and content, allowing you to test changes without affecting the live site. Developers have had multidev environments for a while. This is now the content editor’s version!
Drupal now supports Single-Directory Components in core. SDCs provide a simplified front-end development workflow based on components, where all the files needed for the component are in the same directory. This increases developer productivity and makes components more shareable.
The new Navigation module, which rewrites the admin toolbar using modern tools. This Navigation toolbar adds a collapsible left-aligned sidebar that organizes the administration menu and allows customization by including other blocks or menus.
One of the most significant additions is the experimental Recipes API, for which I am a core subsystem maintainer. Recipes allow for the easy sharing of module configuration changes and additions, allowing you to add functionality without rebuilding it every time. An example recipe would add an Event system—and it includes everything you need, including a content type, taxonomies, a calendar view, meta tags, etc.
Recipes are the backbone of the Drupal Starshot initiative which aims to create Drupal CMS, a new preconfigured install of Drupal.
The new Access policy API allows developers to create access verification and granting that extend well beyond Drupal’s already robust roles and permissions systems. Imagine you want to limit how many pages a person can make or restrict access to a site to only certain hours. You can now build custom policies to suit an ever-increasing number of options.
If you’re starting a new project today, there isn’t much holding you back from starting on Drupal 11. You may need to patch a couple of contrib module’s core_version_requirements, but more and more updates are happening daily.
Update to the latest version of Drupal 10.3. All sites upgrading from 10 to 11 must be on the latest version, so be sure to update to 10.3 first.
Update to PHP 8.3. Verify that your host, local development environment, and custom code all work with PHP 8.3, which is required for Drupal 11.
Run Upgrade Status and Drupal Rector.
This will find and fix any modules that need updating and deprecated code.
If you’re a Kanopi client, we run rector on every pull request to ensure we catch and fix deprecations early, as most of the deprecations for Drupal 11 were documented on Drupal 10.2. If you want to learn more about our continuous website improvement services, please contact us.
You have time to upgrade!
Drupal 10 will continue to be supported until Drupal 12 is released in June 2026. This still gives you plenty of time to prepare your site if you have custom code or have contributed modules that need to be upgraded to PHP 8.3.
However, if your site can run on Drupal 10.3 and PHP 8.3, upgrading to 11 should be part of your short-term development plan — in order to stay current and take advantage of the additional performance enhancements and new tools available.
Performance is crucial for any website, and a website built with the Drupal or WordPress content management system (CMS) is no exception. Search engines prioritize mobile website performance, and users abandon websites that load too slowly, so ensuring fast loading speeds is essential.
While Drupal and WordPress offer a solid foundation, adding features, themes, and modules/plugins can slow down your site. In this blog post, we’ll explore strategies to improve the performance of your Drupal and WordPress sites and some pitfalls to avoid.
Measuring Performance with Google Pagespeed Insights
How fast is your site? Google Pagespeed Insights is an excellent tool for measuring performance. It provides Core Web Vitals and an overview score with recommendations for improvement. Focus on achieving a general site performance score of 80+ and passing all Core Web Vitals.
Strategies for Boosting Pagespeed
1. Cache and Aggregate
Caching can significantly enhance performance. WordPress Performance plugins can handle CSS/JS caching, while full-page and database query caching require additional plugins and fine-tuning for optimal results. Drupal, however, has these performance enhancements already baked into the CMS.
Consider using performance-oriented plugins on your WordPress site. Autoptimize, Phastpress, and Hummingbird are popular options that can significantly enhance site performance.
Drupal handles this with its internal caching. Enable Drupal’s built-in caching for all your pages, blocks, and views, and enable CSS and JavaScript aggregation on the Performance page.
These plugins and configurations may require platform-specific adjustments or specific settings for certain hosting environments, so testing is crucial.
2. Choose a Good Hosting Environment
Shared website hosting can be affected by other websites, adversely impacting your page speed. Dedicated or managed hosting environments offer better performance at a reasonable cost. Providers like Pantheon offer dedicated hosting for Drupal and WordPress, whereas Acquia provides dedicated Drupal hosting. WPEngine and Kinsta provide dedicated WordPress hosting. Any of these managed hosting providers are an excellent starting point.
Managed hosting environments often provide their own caching mechanisms that are worth exploring for their known performance benefits.
Varnish, for example, can dramatically improve performance. Consider Memcached or Redis for faster, more scalable caching — especially with complex Drupal or WordPress sites.
3. Image Size Matters
Even Drupal and WordPress have limits when compressing large images. Upload images close to the required size or aspect ratio. Configuring Drupal and WordPress to resize images automatically is essential for a fast experience.
4. Optimize Images
WordPress and Drupal can generate adequately sized images for your website, but newer formats like SVG, WebP, and Avif offer better compression without compromising quality.
WordPress plugins like WebP Express, ShortPixel, SVG Support, and Safe SVG can reduce image size quickly and offer SVG support.
In Drupal, the SVG Image module lets you add support for SVG files to the standard image field. It also facilitates web image format conversion through a filter within Drupal core image styles, which you can configure according to your needs.
It’s equally important to ensure the image loads are sized appropriately for the device accessing your site. Whether using Drupal or WordPress, you’ll want to ensure that responsive images are set in the SRCSET or your IMG tag. WordPress typically adds responsive images by default. You can manipulate these defaults using the wp_calculate_image_srcset() and wp_calculate_image_sizes() filters outlined within the WordPress Developer Resources. In Drupal, we do this using the module Easy Responsive Images.
Lazy loading images is an effective way of deferring the load of images until they’re about to enter the viewport.
Optimizing video embeds is as effective as optimizing your images. With Drupal, we do this using the Lite Youtube Embed module, which allows the videos to be lazy loaded.
5. Avoid Too Many Scripts
Google Tag Manager makes it easy to add multiple scripts for user journey tracking — but too many scripts can hinder performance. Regularly review and remove unnecessary third-party scripts to optimize site speed. We wrote a blog post on how to improve performance in Google Tag Manager.
6. Copy/Pasting? Clean Your Content
When copying and pasting text from another document, clean out extra metadata and styling. Drupal and WordPress can clean some of it, but it’s best to avoid loading unnecessary content. When possible, always paste text without formatting.
7. Update, Update, Update
Regardless of which platform you choose, it’s critically important to keep the content management system and its corresponding modules or plugins up-to-date. Drupal core and modules and WordPress core and plugin updates can offer performance and security fixes.
Be sure to keep PHP on the most recent stable version supported by Drupal or WordPress to benefit from performance and security fixes.
Strategies to Avoid
1. WordPress Page Builders
Avoid using page builders on the built-in WordPress block editor (Gutenberg). Gutenberg has improved site editing to the point where additional page builders — such as Elementor or Beaver Builder — are rarely needed. They can negatively impact site performance.
In Drupal, however, there is no equivalent page builder. It is important to use themes and modules that do not provide unnecessary bloat.
2. Excessive Plugins
Many Drupal modules or WordPress plugins can have unnecessary features that slow down your site. If you only need one feature from a module or plugin that loads many others, consider finding a more lightweight alternative. The functionality provided by that one feature within that module or plugin may be able to be written within your theme or a custom Drupal module or WordPress plugin for a more performant and secure site.
It’s always essential to audit your Drupal modules and WordPress plugins regularly. We would recommend quarterly. Disable unnecessary Drupal modules and WordPress Plugins that consume resources, and consider removing them from the code base completely where possible.
3. Frameworks and Bloated Themes
Adding frameworks like Bootstrap, icon packs, and fonts to a theme can increase CSS and JS bundle size. If you can’t optimize these effectively, stick to creating what you need on an existing theme. Less is definitely more in this case.
The payload of CSS for what loads above the fold on a page can be managed using Critical CSS.
Some parting advice:
Write efficient custom code in your theme and Drupal module or WordPress plugin to ensure it is optimized for performance. If you’re a developer, disable caching and aggregation when developing to avoid issues.
As always, test, test, and test again. Test the site under heavy load to simulate real-world scenarios to uncover bottlenecks, and use third-party services such as New Relic to help dig into these bottlenecks.
Drupal and WordPress provide a solid foundation for performance, but modules, plugins, themes, and functionality can reduce site speed. Monitoring performance is crucial — and pairing it with continuous optimization is essential. For more advanced assistance, feel free to get in touch; we’d be happy to provide expert advice, and even a few performance improvements.
Did you know that Shane is our very first Kanopi employee, ever? If you’ve enjoyed reading his post, please check out his other great works in our blogosphere, such as:
At the keynote speech at DrupalCon 2022, Dries Buytaert, the founder of Drupal, presented the idea of “Starter templates” to help ambitious site builders quickly and easily create solutions. From that, the Distributions and Recipes initiative was born.
Drupal recipes are the foundation for the new Starshot Initiative, which aims to make Drupal easier to use and out of the box for all users. It took a couple of years, but Recipes have been added to Drupal core in 10.3 as Experimental APIs.
(If you prefer webinars, I gave a webinar on Recipes, Starshot, and the future of Drupal. Check it out.)
The Problem
For decades, developers have been packaging functionality together for Drupal to create different solutions, such as eCommerce stores, blogs, LMS, social media, and publishing sites. Many approaches were taken, each with its own pain points.
Installation Profiles
You can only start with them.
Once you start with them, you are stuck with them forever!
You can’t change to a different install profile.
Distributions
Complex dependencies that need to be maintained
Updates could break customizations
Would be hard to get solutions into Drupal core.
Features and Custom modules
As with the above, these often become complex and hard to manage.
Need update hooks or manual steps to alter core and other contrib module’s configuration.
The Solution
An issue has been created to add four new APIs to Drupal that will allow Recipes to be applied to Drupal. These recipes allow Drupal module automation, theme installation, and configuration at any time during the lifecycle of a Drupal site. They can install modules, import configuration, alter existing configuration, and even provide content to a Drupal site. Recipes are ephemeral; once applied, the results become the site’s responsibility.
What makes up a Drupal Recipe?
A recipe needs only a folder with the recipe’s name, which contains a recipe.yml file. Beyond that, optional items are a /config folder, a /content folder, and a composer.json file. You can also include README.md and LICENSE.md files like a module or theme.
Once you’ ha’ve patched your Drupal core version, you can use the internal script to apply a recipe to an existing site. On your command line, run the following command from your webroot:
This command uses PHP to find the “recipe” script in core/scripts/drupal. Then list the full path to the recipe. The -v flag has the recipe runner output the application steps as they happen on the command line.
Once you apply the patch, you will get Drupal recipes from core! Core’s recipes currently include the Standard installation profile recreated as recipes. You can apply Standard and get all the functionality or apply them individually as needed. They were created to be very atomic — so that you can choose your own adventure.
Applying a recipe using Quick Start
Another Drupal script allows you to install Drupal from a recipe. When you do this, you do not start from an install profile! This is a new change. Previously, you at least had to start with a minimal profile; now, that is no longer needed.
If you’re starting a new Drupal install, you can use the following script:
The Recipe API depends on DefaultContent, Action, and Checkpoint. The other three APIs have no interdependencies.
Drupal\Core\Config\Checkpoint
A checkpoint is made for the site’s configuration when a recipe is applied. The recipe runner uses this to revert if the application fails, but there may be other uses for this in the future, like unapplying a recipe.
Drupal\Core\DefaultContent
This API’s code came from the contributed Default Content module. It allows recipes to provide content to Drupal using YAML files.
Drupal\Core\Config\Action
The Config Action API is the magic of the recipe system. It allows you to alter configurations already in a site, including core’s configs!
Drupal\Core\Recipe
Finally, the Recipe API puts it all together and applies the recipe. The recipe runner takes a recipe, and follows the following steps:
Applies dependent recipes
Install modules and themes
Imports configuration from the /config folder
Alters configuration based on actions
Imports content from the /content folder
Deep Dive into an Actual Recipe
This recipe creates two fully configured content types. It includes meta tags, paths, configured admin forms:
name: 'Saplings - Content types'
description: 'Configuration for the Saplings Content types.'
type: 'Site'
# Here we require other dependent recipes.
recipes:
  - saplings-content-base
  - saplings-component-types
# Now we install modules.
install:
  # Core.
  - menu_ui
  - tour
  # Contrib.
  - access_unpublished
  - field_group
  - metatag_open_graph
  - metatag_twitter_cards
  - pathauto
  - publication_date
  - scheduler
  - scheduler_content_moderation_integration
  - schema_article
  - simple_sitemap
  - token_or
  - ui_patterns_layouts
config:
  # Now can import configuration
  import:
    # Core.
    menu_ui: "*"
    # Contrib.
    access_unpublished: "*"
    pathauto: "*"
    # If we only want to import certain configs, we can identify them like this.
    scheduler:
      - scheduler.settings
      - views.view.scheduler_scheduled_content
  # Config actions are where we can change configuration in Drupal
  actions:
    # Set Metatag Home page:
    metatag.metatag_defaults.front:
      simple_config_update:
        tags.canonical_url: '[site:url]'
        tags.description: '[node:sa_description|node:sa_seo_description]'
        tags.image_src: '[node:sa_seo_image:entity:field_media_image:sa_social_media_facebook|node:sa_featured_image:entity:field_media_image:sa_social_media_facebook]'
     tags.og_description: '[node:sa_description|node:sa_seo_description]'
    # Set permissions for anonymous role.
    user.role.anonymous:
      ensure_exists:
        id: anonymous
      grantPermissions:
        - 'access content'
        - 'access sitemap'
        - 'access_unpublished node sa_page'
        - 'access_unpublished node sa_post'
    # Set permissions for content editor role.
    user.role.content_editor:
      ensure_exists:
        id: content_editor
      grantPermissions:
        - 'access administration pages'
        - 'access block library'
        - 'access content overview'
        - 'access environment indicator'
        - 'access environment indicator ribbon'
        - 'access help pages'
        - 'access media overview'
        - 'access media_entity_browser entity browser pages'
        - 'access media_entity_browser_modal entity browser pages'
What are Config Actions?
As you can see in the recipe example above, you can import config from modules and themes, and take action against config that already exists. Config actions are written to make specific changes to config files — including Drupal core configuration files, which previously could only be done through update hooks.
Look for this list to update as the initiative digs into phase 2 and creates more recipes and possibilities.
Available to all config entities
simple_config_update
This is a config action that can be used to make foo: bar type updates to any configuration file.
setThirdPartySetting(s)
The setThirdPartySetting(s) config actions allows recipe authors to set third-party
settings values. Add the ‘s’ to apply multiple third part settings.
ensure_exists
This action can be used to ensure as a user role exists before applying other actions. It helps a recipe not fail if the role does not exist.
create
The create config action can be used to create a config entity, but it is much easier to just put the config file in the /config folder.
Applicable to specific config entity types
addItemToToolbar
Used to add a button to the toolbar of a CKEditor 5 editor.
addToAllBundles
Used to add a field to all bundles of an entity type. Should be used in combination with setComponent(s) below to make sure the field displays on forms and displays.
addNodeTypes, addTaxonomyVocabularies
Used to add editorial workflows to node and taxonomy bundles.
grantPermission(s)
Used to grant permissions to any user.role.* config files. Add the ‘s’ to add multiple permissions.
setComponent(s)
Used to to add fields to an entity’s view or form display configs.
What’s next for Drupal Recipes?
Now that recipes are in Drupal core, the phase 2 of the roadmap will soon be updated. Integration with Project Browser, and recipe creation in Starshot are definitely on the top of the list, but there are lots more things to do. Stay tuned and check out the issue queue to learn more!
That translates to 252,000 new websites created each and every day.
How can you ensure your website’s content is optimized to attract and retain visitors against an ever-increasing number of websites vying for our attention — and that it reaches the coveted top spot on Google’s search engine results page?
At the very least, consider the questions Google asks for creating helpful, reliable, people-first content.
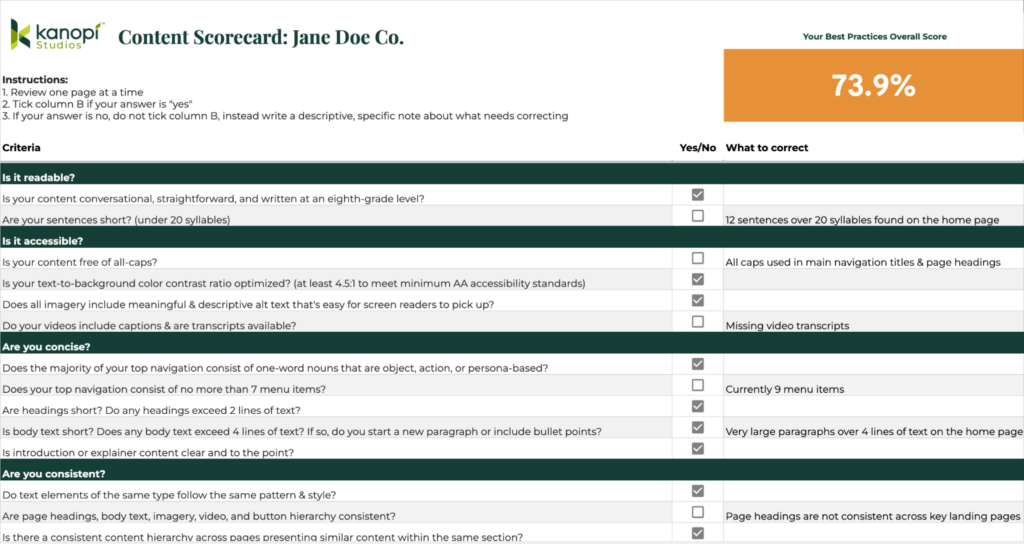
Now, if you really want to take your content to the next level, read on to learn about Kanopi Studios’ Content Scorecard. We’ve built a powerful tool that allows you to evaluate various aspects of your content and identify areas that offer the greatest opportunities for improvement.
Getting a team excited about a big website redesign is easy. What’s less easy is getting folks excited about a content audit. How do you show a content audit is worth the time and resources? By focusing on the value of completing one.
In this blog, we’ll explore the key metrics of Kanopi’s content scorecard and discuss how it can assist you with auditing the content found on your website, along with the benefits of doing so.
Before we dig into the key metrics, let’s discuss content audits and ROI.
Content audits pinpoint costly problems
Content can expire faster than a carton of milk in your fridge. And if content is no longer helping folks complete key tasks on your site, it could be doing more harm than good.
If any content on your site is actively losing leads, it needs your full attention.
A range of issues impacts your content’s ability to reach and convert your website visitors, including:
outdated information
accessibility issues
confusing or unclear messaging
non-intuitive website navigation
poor readability, and
technical problems like missing metadata.
These challenges can drive website visitors away from your site. Running a content audit can help you find and fix the most prominent issues before they become costly.
Content audits extend the life of existing content
Content audits aren’t just for analyzing your site’s content and finding mistakes. They also discover opportunities to get more out of your existing content.
Content improvement plans tend to surface naturally as a result of content audits. They uncover powerful opportunities to:
Drive more traffic to your site, improving search engine rankings while beating your competitors to the top spot on Google’s search engine results pages.
Stand out from the rest, elevating important differentiators to help you overtake your competitors.
Convert site visitors to patients or customers through increased engagement and conversion optimization.
Numbers always help folks visualize impact. Kanopi audited the Alameda County Community Food Bank’s website content and navigation, using findings to develop a strategy that led to:
+37% in page views per session and
93/100 accessibility score.
Content audits increase the ROI of long-term strategy
Important marketing campaigns need to begin with an informed, data-backed strategy. If you’re about to start a project like a website redesign, begin with a content audit to understand:
what content you currently have,
how your content is performing, and
how to take a holistic approach to improve all site content.
The optimal moment to capture these insights is before you make big changes.
Set yourself up to get the best possible return by setting benchmarks for measuring content performance and how you’ll evaluate success instead of devoting vital resources to something that’ll need fixing later on.
Now, let’s get into Kanopi’s content scorecard metrics used with every content audit we run for our clients:
Content Best Practices
Writing for the web means taking a user-first approach and getting to grips with how people consume content. People aren’t reading your content word-by-word. Instead, folks scan for keywords that help them accomplish the goal of their visit to your website.
Apply these eight proven best practices to ensure your site’s content is actionable and purposeful:
1. Readability
When it comes to your content, readability significantly impacts user engagement.
Simply put, content that‘s easy to read and understand is more likely to resonate with your website visitors.
To evaluate readability, make sure your content is conversational, straightforward, and written at an eighth-grade level. Authoring tools like the Hemingway Editor can help you evaluate the reading level of your content.
Also, you’ll want to ensure that your sentences are short and concise — ideally 20 syllables or less.
2. Accessibility
Ensuring that your content is accessible to all users, including those with disabilities, is not only a legal requirement but also a sound business decision. The World Health Organization estimates that 1 in 6 of us experiences significant disability. Why create unnecessary barriers for folks using your website with inaccessible content?
Check factors such as text-to-background color contrast ratio, meaningful alt text for images, captions for videos, and availability of transcripts.
The WAVE web accessibility evaluation tool provides browser extensions that help you identify which content on your web pages is causing the most challenging accessibility issues.
3. Brevity
In today’s fast-paced digital world, we all have short attention spans, which is why it’s crucial to keep your website’s content concise and to the point.
Save the elaborate prose for that novel you’ve been meaning to write. You can evaluate the brevity of your site’s text-based content by examining factors such as the length of navigation items, headings, body text, and introduction/explainer content.
4. Consistency
Consistency is vital to creating a cohesive and user-friendly experience across your website.
You can assess consistency by checking if text elements follow the same pattern and style, if there is a consistent content hierarchy across pages familiar to folks, and if navigation pathways are logical and easy to follow.
5. Clear Pathways
Your content should guide users along a clear path down every page and across to related pages on your site, leading them to the next desired action.
Check that the next desired action you want folks to take is clearly stated on the page, that the page is organized logically, and navigation pathways are easy to find and follow. Prominent breadcrumbs help people keep track of where they are within the content on your site.
6. Accuracy
Ensuring that your content is accurate and up to date is essential for maintaining credibility and trust with your website visitors.
Evaluate accuracy by checking for outdated information and verifying that content has been fact-checked by one of your subject-matter experts.
7. Narrative Progression
Effective storytelling can captivate your audience and keep them engaged with your content.
Assess your narrative progression by checking if content flows logically from the top of each page to the bottom, providing users with a cohesive and engaging experience. Headings, subheadings, body text, and buttons should relate to each other and guide folks to easily move down each web page.
8. Telling your story
Every piece of content on your site should serve a purpose and contribute to your overarching narrative. Every word, image, video, and graphic should relate to each other and help you tell your organization’s story.
Evaluate your storytelling chops by checking if text complements images, illustrations, and videos and if it’s clear how each piece of content contributes to telling your story.
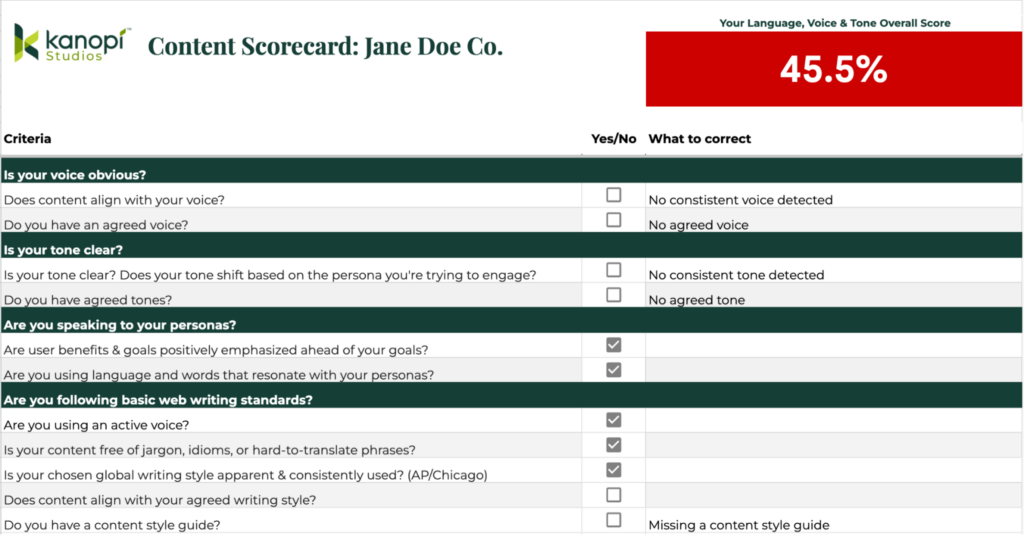
Language, Voice, & Tone
Determining the right voice and tone — and which words to use to convey your voice and tone — is essential to engaging your site visitors and creating a connection with them.
Different content warrants a shifting tone (e.g., if you’re discussing cancer treatment options it’s best not to be too light), but generally speaking, aim for a personal, positive tone when writing content.
Strike the right balance between appearing casual with your readers while avoiding bureaucratic or institutional speak. Your writing should sound like it is coming from a human, not a corporate robot. ‘Write like you talk’ is a helpful phrase to remember to ensure your writing isn’t too stiff.
Getting your tone right can be tricky, but studies show it dramatically impacts your user’s perception of your organization. Here are four key points to remember:
1. Your Voice
Your organization’s voice is its personality — it sets the tone for communicating with your website visitors.
Assess your voice by checking if content aligns with your brand’s voice, and if it’s consistent across your site. (If you don’t have written guidelines in place describing your brand voice, we’d strongly recommend you start there.)
2. Your Tone
The tone of your content can vary depending on the audience you’re trying to reach and the message you’re trying to convey.
Evaluate your tone by checking if it’s clear, consistent, and resonates with your target personas.
3. Persona Alignment
Tailoring your content to resonate with your target personas is essential for connecting with the people who matter most to your organization.
Evaluate persona alignment by checking that your content emphasizes user benefits and goals and if the language and words on your site resonate with the people who visit it daily.
What is a persona, you ask? Personas are archetypical users whose characteristics and goals represent the needs of a larger group of your audience. Learn more about how personas help with web design.
4. Web Writing Standards
Adhering to basic web writing standards can improve the clarity and effectiveness of your content.
Check your content uses an active voice, avoids jargon and idioms, follows a consistent writing style, and aligns with your agreed content style guide.
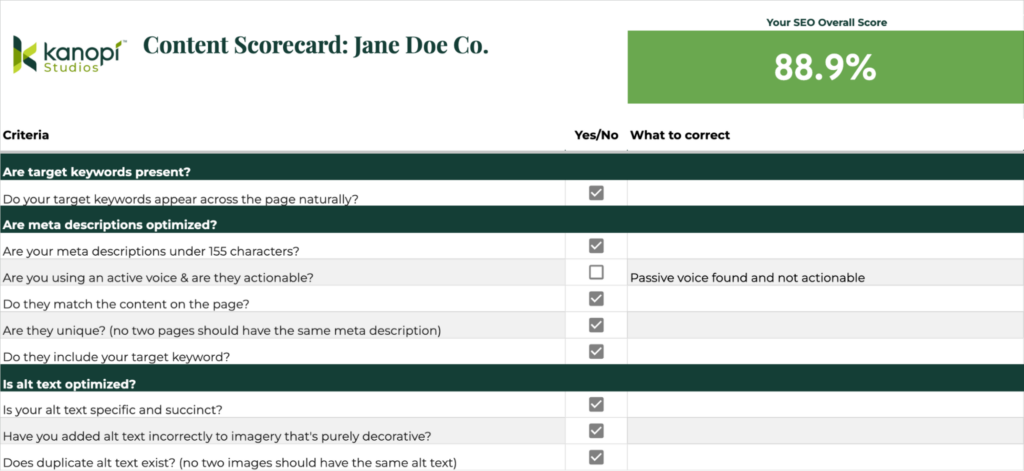
Search Engine Optimization (SEO)
There’s no denying that optimizing your content for SEO impacts your content’s performance and helps you meet important marketing goals.
Without it, your organization could be missing out on organic traffic, leads, sales, visibility, and rankings. Zero in on your keywords, meta descriptions, and alt text to get the most out of your existing content:
1. Keyword Optimization
Optimizing your content for relevant keywords can improve its visibility in search engine results.
Achieve basic keyword optimization by checking if target keywords are present and appear naturally throughout each page within headings, subheadings, body text, and buttons (as opposed to throwing them in without considering their proper context, a.k.a. ‘shoehorning’).
2. Meta Description Optimization
Meta descriptions play a crucial role in attracting clicks from folks using search engines to find what they need. Evaluate your meta descriptions by checking if they’re under 155 characters, use an active voice, match the content on the page, are unique, and include target keywords.
3. Alt Text Optimization
Alt text is essential for providing context to users who cannot view images.
Review your site’s alt text by making sure it’s specific succinct, and correctly applied to relevant images. Also, ensure all images have unique alt text. Duplicate alt text can confuse folks who use a screen reader when exploring your site.
Ensure your content is readable, accessible, SEO optimized (and more!)
By closely examining your content to ensure it follows best practices, you can pinpoint areas that need improvement and make sure your content is engaging, accessible, and optimized for both visitors and search engines like Google.
By conducting regular content audits using Kanopi’s content scorecard, you can maintain high-quality content standards and ensure that all the content on your website tells your unique story.
If you need help with your next content audit, don’t hesitate to get in touch with Kanopi. We’re more than happy to help you get started.